How to create a custom private client app in Azure
A custom private client app can be used for PD to sync user information, as well as sending emails (reports, user PINs, etc) and receiving emails (email-to-print).
The advantage of using a custom private client app over a user delegated app is that the ‘client secret’ can be valid for up to 2 years. A user delegated token can only last a maximum of 90 days before a new one must be created.
Register an Application
- Log in to portal.azure.com with an account that has sufficient rights to register new applications.
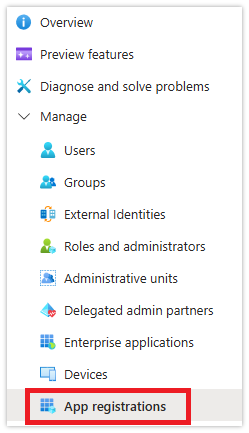
- Go to Microsoft Entra ID.
- Click App registrations.
- Click New registration.

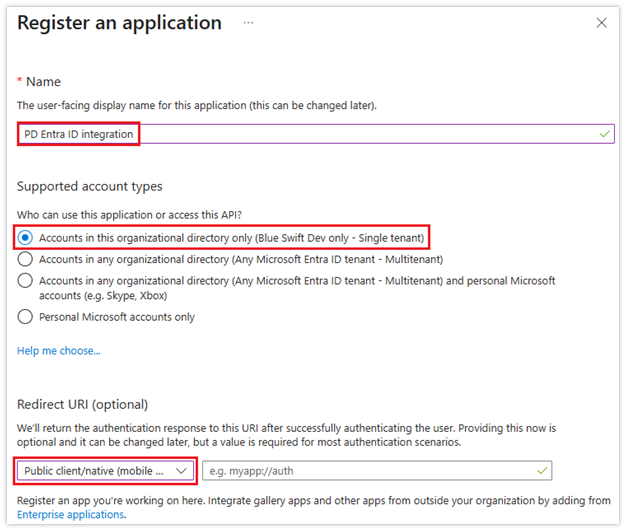
- Enter a name for your custom application (e.g. PD Entra ID integration).
- Choose Accounts in this organizational directory only (Single tenant).
- Change the Redirect URI to Public client/native (mobile & desktop). Leave the URI field blank.
- Click Register.
Create the application Client Secret
Now that we’ve registered a private client app, we must add a secret key that PD will use to prove it is allowed to use the app.
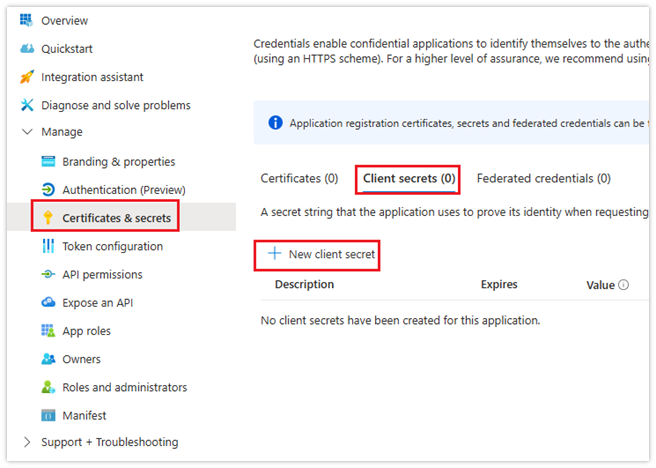
- Click Certificates & secrets.
- Click New client secret.
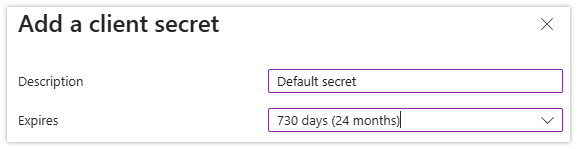
- Enter a Description for the secret, e.g. Default secret.
- Choose the validity length from the Expiry dropdown. The maximum is 2 years. After expiry, a new secret must be created.
- Click Add.
- IMPORTANT: Once the secret is created, copy the Value (not the Secret ID) and save it somewhere. After a while, the Azure portal will hide this value, so make sure you have recorded it. This will be needed in the app configuration in PD.
Permissions for Entra ID sync (user information sync)
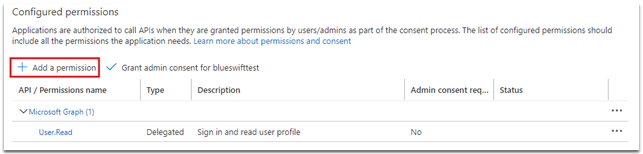
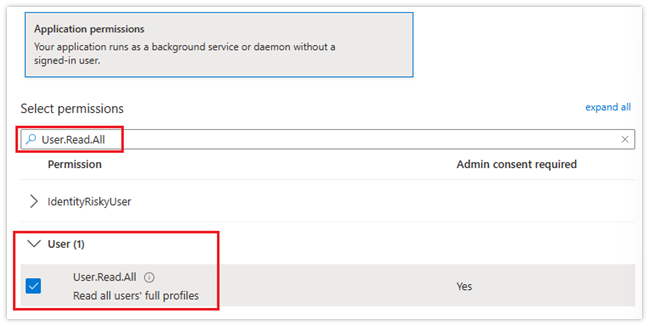
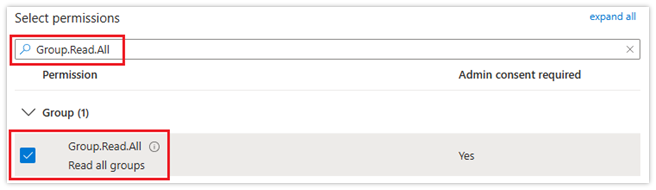
Two API permissions are required for the Entra ID user information sync: User.Read.All and Group.Read.All. Both of these require admin consent.
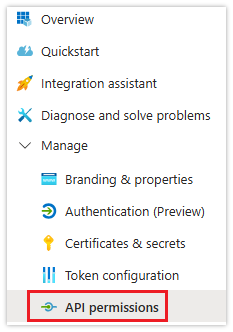
- Click API permissions.
- Click Add a permission.
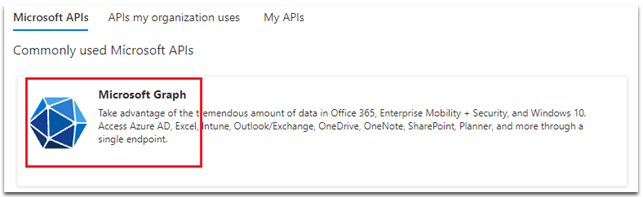
- Click Microsoft Graph.
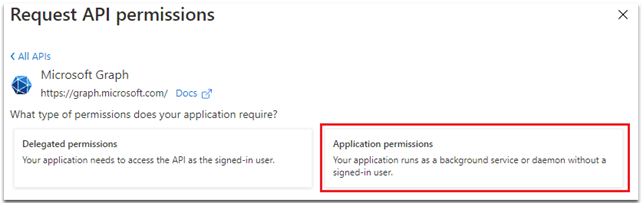
- Click Application permissions.
- In the Select permissions search box, type Read.All. Click the down symbol next to User and then tick the User.Read.All checkbox.
- Now enter Read.All and tick the Group.Read.All checkbox.
- Click Add permissions.
- Now we need to grant admin consent for permissions. Click the Grant admin consent for tenantname button.
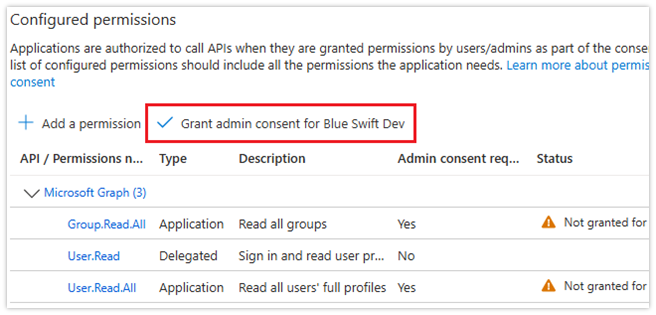
- Click Yes to confirm.
Permissions for email send/receive
For PD to send emails, the client app must have both the Mail.Send and Mail.ReadWrite permissions. The simplest way to allow this, is to add these permissions just like we did for reading user information. However, these permissions have tenant-wide scope. This means that the client app credentials could allow reading all users’ emails for the whole tenant, as well as sending emails as any user.
A more secure method is to only allow these permissions for the specific mailbox. This requires the configuration of Microsoft Exchange Online Role-Based Access Control (RBAC) for Applications.
Prerequisites for RBAC setup
- Exchange Administrator role (or Organization Management role group membership)
- PowerShell running as Administrator
- Exchange Online Management PowerShell module
- Application ID and Object ID from the Enterprise Applications page in Entra ID
Installing the Exchange Online Module in PowerShell
If you know that the Exchange Online Module has already been installed, skip to the next section.
- Open PowerShell as Administrator (right-click PowerShell and select “Run as administrator”)
- Run the following command:
Install-Module -Name ExchangeOnlineManagement -Force
- Wait for the installation to complete.
Connect to Exchange Online
Once we’ve ensured the Exchange Online Module is installed, we can connect to Exchange Online.
In an elevated PowerShell window, run this command:
Connect-ExchangeOnline
This will start the Microsoft credential flow UI. Ensure you log in with an account that has the Exchange Administrator role or Organization Management role group membership.
Enabling Organization Customization
We now need to create management scopes for the app. This requires ‘organization customization’ to be enabled for the tenant. It is disabled by default. To check if it is enabled, run this command:
Get-OrganizationConfig | Format-List IsDehydrated
- True = Organization customization needs to be enabled
- False = Already enabled, skip to the next section
If it is True, run this command:
Enable-OrganizationCustomization
This command may take up to 30 minutes to complete. Wait for the prompt to return before proceeding.
You may encounter the following error:
Resource ‘Processor (servername)’ is unhealthy and shouldn’t be accessed.
This is a transient backend infrastructure issue on Microsoft’s side, not a configuration problem. To resolve:
- Wait 15-30 minutes and retry the command.
- If it persists, wait up to 24 hours as these issues are usually temporary.
- Check the Microsoft 365 Service Health Dashboard for any ongoing incidents.
- If the issue continues beyond 24 hours, contact Microsoft Support through the Microsoft 365 admin centre.
IMPORTANT: You only need to run Enable-OrganizationCustomization once per tenant. After it completes successfully, you will not need to run it again.
Obtain Application IDs from Entra ID
We need these for creating the Service Principal and to assign the Application Roles.
- Navigate to the Enterprise Applications page in Entra ID (not App Registrations):

- In the list of applications, click the app you created.
- On the Overview page, copy both:
- Application ID (also called Client ID)
- Object ID (the Service Principal Object ID)
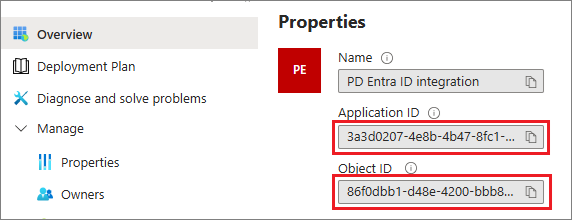
- IMPORTANT: Use the IDs from Enterprise Applications, not App Registrations. The Object IDs are different.
Create Service Principal in Exchange
Create a pointer to the Entra ID application in Exchange Online. Run this command:
New-ServicePrincipal -AppId “<Application-ID>” -ObjectId “<Object-ID>” -DisplayName “Print Director”
Replace the placeholder values with your actual IDs.
Create Management Scope
Create a scope that identifies only the mailbox to be used by Print Director. If the mailbox to be used by PD has the address printdirector@yourdomain.com, this would be the command:
New-ManagementScope -Name “PrintDirector-Mailbox” -RecipientRestrictionFilter “PrimarySmtpAddress -eq ‘printdirector@yourdomain.com'”
Ensure you change the email address to the mailbox address you want to use.
Assign Application Roles
Assign the required permissions to the service principal with the management scope.
This command is not only for reading/downloading mails (for email-to-print), but also for sending emails with large attachments that need to be batch uploaded:
New-ManagementRoleAssignment -Name “PD-MailReadWrite” -Role “Application Mail.ReadWrite” -App “<Application-ID>” -CustomResourceScope “PrintDirector-Mailbox”
Ensure you replace <Application-ID> with the Application ID you copied above.
This command is also needed for sending emails:
New-ManagementRoleAssignment -Name “PD-MailSend” -Role “Application Mail.Send” -App “<Application-ID>” -CustomResourceScope “PrintDirector-Mailbox”
Again, ensure you replace <Application-ID> with the Application ID you copied above.
Test the Configuration
You could test the configuration by creating the record in PD and trying to send emails and receive email-to-prints. But to quickly check the configuration, we can run some commands in PowerShell. Note that the configuration changes can take up to 2 hours to propagate due to caching.
- Verify Access to the Configured Mailbox (change the <Application-ID> and mailbox address):
Test-ServicePrincipalAuthorization -Identity “<Application-ID>” -Resource “printdirector@yourdomain.com”
- Expected result: InScope = True
- Verify No Access to Other Mailboxes:
Test-ServicePrincipalAuthorization -Identity “<Application-ID>” -Resource “anotheruser@yourdomain.com”
- Expected result: InScope = False
IMPORTANT: Wait Time Required
After completing the RBAC configuration, you must wait 30 minutes to 2 hours before the permissions become active. The Test-ServicePrincipalAuthorization command shows results immediately because it bypasses the cache, but actual email operations will fail until the cache propagates.
If you receive “Access denied, check credentials” errors immediately after configuration, wait 2 hours and try again.
Create MS Graph application authentication record in PD
The application authentication record can be created in PD via the Entra ID Sync Scheduled Task, the Email Send Accounts, or the Email Receive Accounts. The same record can be used for all of them if the azure app has all the appropriate permissions. For example, if you created the record via an Entra ID Sync, you can just select the same one when creating an Email Send Account.
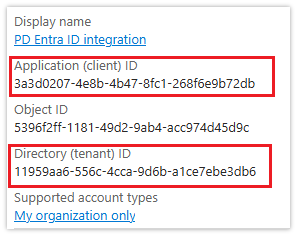
Obtain the Application ID (client ID) and the Directory ID (tenant ID)
Firstly, we’ll need the Application ID (client ID) and the Directory ID (tenant ID) from the portal.
- In Entra ID, click App registrations:

- Click All applications and then click the app that you created.

- In the Overview page, copy the Application (client) ID and the Directory (tenant) ID.
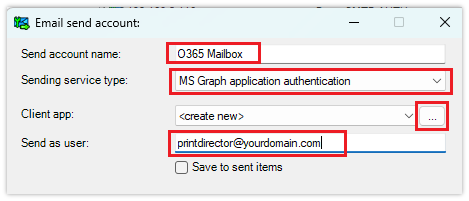
Creating the MS Graph application record for an Email Send Account
This example uses an Email Send Account to create the MS Graph application record for PD. But it can just as easily be created in an Entra ID Sync, or Email Receive Account.
- In Resource Manager, navigate to Email Management > Email Send Accounts.
- Click Add.
- Enter a name for the account.
- Change the Sending service type dropdown to MS Graph application authentication.
- Enter the mailbox address in the Send as user textbox.
- If you had already created the MS Graph app record via an Entra ID Sync scheduled task or Email Receive Account, you could select it from the Client app drop down. In this example, we’ll be creating one.
- Click the … button next to the Client app dropdown.
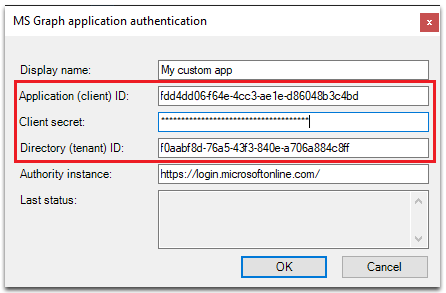
- In the search window that opens, click the New button.
- Enter any name for the custom application.
- Paste the values copied from the Application Overview details (along with the client secret) into the fields and click OK.
Now you can test sending emails.
|
Document revision date: 2026/02/03 |
