How to set up a Microsoft Entra ID Sync
Print Director can import and maintain user records by synchronising its database with Microsoft Entra ID. This alleviates the administrative task of ensuring users have the correct up-to-date settings and information (e.g. full name, email address, telephone extension).
Create the Microsoft Entra ID Sync Scheduled Task
- Open Resource Manager.
- Navigate to Scheduled Tasks > Microsoft Entra ID Sync.
- On the right-hand side, click Add.
- In the Scheduled Task Name textbox, enter a descriptive name, e.g. Main Sync. If you leave it blank, it will default to the tenant name (e.g. acme.onmicrosoft.com).
- In the Execute on PDServer dropdown, choose the server on which you would like the task to execute.
Specify the schedule on which the task will execute
- Open your Microsoft Entra ID Sync scheduled task if it is not still open.
- Click the Schedule tab.
- In the Schedule Range frame, change to the desired Execute time if the task is not going to run Hourly. If it is going to run Hourly, the execute time has no effect.
- In the Schedule Pattern frame, choose the frequency of the execution. The default is Daily.
Sync Settings tab, Import settings
Here we will specify the general import settings for the sync.
Specify the authentication mechanism for Entra ID access
Print Director supports two authentication mechanisms for accessing the Entra ID directory. Namely, User delegated or Client Secret.
User delegated means that the permissions required for the sync will be requested when the token is created. The user that authenticates must have sufficient access to the permissions requested. For synching with the directory, the following permissions will be requested: User.Read.All and Group.Read.All.
The Client secret mechanism requires an App registration to be pre-defined in the Entra ID portal, and the Application API permissions for User.Read.All and Group.Read.All granted with Admin consent.
In the example below, we will be creating a user delegated token as the authentication mechanism.
Creating a user-delegated token
An access token is created when logging in to Entra ID through the Microsoft interactive login workflow. This token only has rights to ‘read’ the Entra ID directory. It is stored for use by PDServer when running the Microsoft Entra ID Sync task.
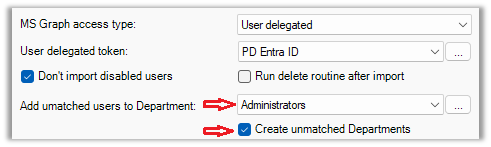
- On the Sync Settings > Import Settings tab, select User delegated from the MS Graph access type drop-down.
- Click the button to the right of the User delegated token drop-down.

- In the Search for MS Graph Delegated Auth Token window, click the New button.

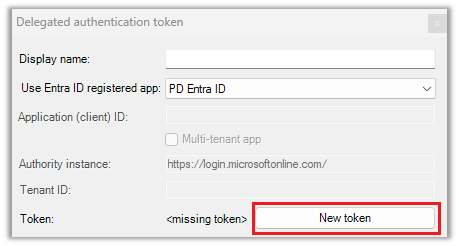
- The Delegated authentication token window will be displayed. Click the New token button.
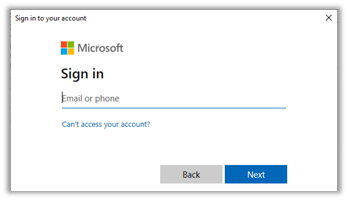
- Now the Microsoft interactive login workflow will start. If an interactive login has been previously performed on this PC, it will show currently signed-in accounts. If this is the case, you can choose the account and click Next. If not, you will need to enter your Microsoft credentials.
- Once you’ve entered your credentials, Microsoft will check if your account has sufficient rights to grant the PD Entra ID app ‘read’ access rights to your Entra ID directory. If it does not have sufficient rights, it will request an Admin to sign in. Click Accept in the Permissions requested window.

- Note that if the user that signs in does not have the Global administrator role assigned, they will need to be assigned to the Application administrator role to grant the app permission to ‘read’ the directory.
- Now click OK in the Delegated authentication token.
- After that, the token will appear in the list. Click OK again.
Don’t import disabled users
If this is ticked, users that have the attribute accountEnabled set to false will not be imported. This attribute can be set in the Azure Portal by editing the user and setting the account status to disabled.
If a user’s account is disabled, they could be deleted from PD depending on delete routine settings (see below).
Run delete routine after import
A user will be deleted from PD only if all the following are true:
- The Run delete routine after import checkbox is ticked.
- The user was previously imported by this same Entra ID Sync and is no longer imported (see reasons for not importing below).
- The user is configured to be deleted if no longer found in the same sync. See User Management > Users > open user > Auth & Importing tab > Importing frame > If created by a sync, delete if no longer found in the same sync checkbox must be ticked.
A user will no longer be imported for any of the following reasons:
- They no longer exist in the Entra ID directory.
- Their user account is disabled in the Entra ID portal.
- Their Group membership has been changed in the Azure portal and the settings on the Group Filters and Rules tab has changed that have resulted in the user being excluded from the import.
Add unmatched users to Department
If a user is imported and their Department couldn’t be set based on the Map user attributes setting for the Department field, then they will be created in this Department.
When the user’s Department field is mapped to an attribute (e.g. the Department attribute) and a value is retrieved from Entra ID (e.g. Marketing), PD will first check whether the Marketing department exists in the PD database. If it does exist, the user will be created (or updated) in this Department. If it does not exist, PD will check the Auto-create unmatched Departments setting. If not enabled, the user will be placed in the Department specified in the Add unmatched users to Department drop-down. If enabled, PD will create the Department and add the user to that Department.
Add unmatched phone extensions to PBX
If your system is not configured for call tracking, skip this section.
If the user’s Tel extension field is mapped to an attribute, and a value is retrieved from Entra ID, PD will assign this extension number to the user. First it checks whether the extension record exists in the database. If it does exist, the user is assigned to that extension number. If it doesn’t exist, it will create the extension record. To create the record, it must know under which PBX record the extension must be assigned. If the PBX Name user field is mapped to an attribute, and a value is retrieved that matches the name of an existing PBX record, the extension will be created under this PBX. If no PBX can be matched, it will use the one specified in the Add unmatched phone extensions to PBX drop-down.
Membership requirements
On the Group Filters and Rules tab, we can limit which users get imported based on their group membership in the Entra ID directory.
Firstly, we must import the groups before we can specify the requirements. Click the Group Filters and Rules tab and then the Download all groups button.
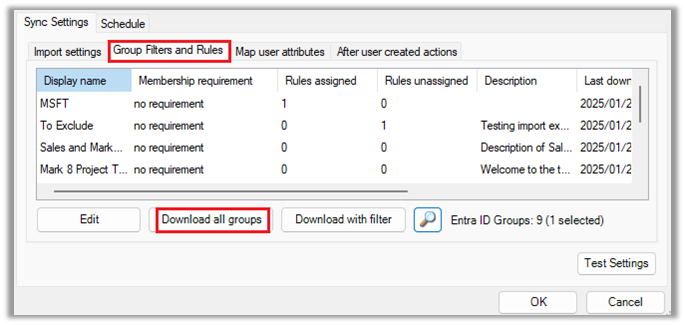
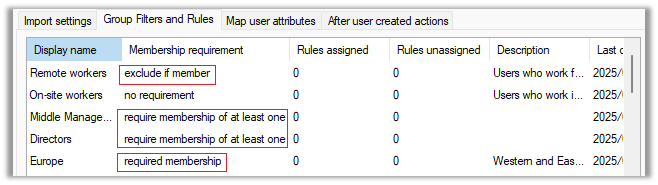
Now we can specify the requirement for each group. Double click a group. The following membership requirement options are available:
- no requirement: This group will not be used to filter the users that will be imported.
- required membership: The user must be a member of this group.
- exclude if member: The user must not be a member of this group.
- require membership of at least one: The user must be a member of at least one of the groups which are set to require membership of at least one.
Note that you can multiselect groups to change the membership requirement for more than one group at a time.
In the example below, only users who are a member of the Europe group, either a member of Directors or Middle management, and not a member of Remote workers will be imported:
Map user attributes
On this tab, we specify which user fields are mapped to which Entra ID attributes. If you double click a user field and click the Map action drop down, you have the following options available:
- not mapped: This user field will not be mapped to an attribute and won’t be affected by the import.
- only if source not empty: The user field will only be updated if the attribute value in Entra ID is not empty. For example, if a user that was already imported has an empty Department attribute value in Entra ID, their Department membership in PD will not be affected.
- always update: The user field will always be updated even if the source attribute value is empty.
- only if destination is empty: The user field will only be updated if the field is currently empty in the PD database. For example, if set on the Card number field, an existing user with card number 123456 will not have their card number updated. Only users whose card number field is currently empty in the PD database will be updated.
In the Map to attribute(s) textbox we put in the attribute label enclosed in square brackets. We can put in more than one and the resultant value will be concatenated.
In the example below, we change the Email address user field to be mapped to the [mail] attribute.
- Double click the Email address User field.
- Delete the contents of the Map to attribute(s) textbox.
- Click the … button to the right of the textbox.
- Click the mail Property and click the Insert button.
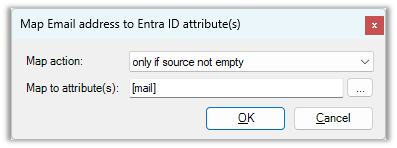
Now the Email address field will be updated in PD if the value of the [mail] attribute for that user is not empty.
Below is a description of the user fields that can be mapped:
- User name: This is the user’s full name. The default is [displayName] but you could change this to specify two attributes: [givenName] [surname]. This will import the user’s first name and surname with a space in between.
- Login name: The Login name is used for the following in PD:
- Matching print jobs to users that arrive in Windows print queues using the job ‘owner’ field.
- End user PDAgent Client app login (if configured for login). See PDAgent > Client app > User auth method drop-down.
- If Resource Manager or PDReports is configured for login (as opposed to using the environment user account).
- Used by the PDAgent IPP print service for queues that have authentication enabled. See Print Management > Print Queue Management > Print Queues > double click print queue > IPP Authentication drop-down.
- Department: Users must belong to a Department in PD. When a user is created during an import, they will inherit all the settings that have been defined for the Department (e.g. Rules and device access, account access and opening balance, popup billing requirements, etc.)
- Email address: Mapping the email address is especially useful. Email addresses are used for the following:
- Scan-to-me functionality on printers using the embedded module.
- Auto-emailing directly from Resource Manager (useful for sending PIN numbers).
- Rule violation notifications.
- User resetting their printer PIN number from the PDAgent Client app.
- User resetting their login password via the PDAgent Client app.
- Sending the Welcome email after a user is created in PD.
- Controller ID (PIN): The PIN is used for the following:
- Logging in to printers configured for PIN number authentication (as opposed to card-swipe or username+password, etc).
- Logging in to PDAgent Client for those PDAgents configured for PIN login.
- Card number: Used for logging in to printers configured for card swipe login.
- User account code: Mapping the User account code is only necessary if you have users with popup account billing and their User Account Code is different from their windows account name. If left unmapped, it will default to their Login name.
- Secondary email address: Currently, the secondary email address is only used for Google Cloud Print authentication. When documents arrive at the print server from Google Cloud, they contain the users’ Gmail address. Print Director then authenticates the user by matching the Gmail address to the secondary email address (Note Google Cloud Print has been discontinued by Google and support will be removed from PD).
- Tel extension: Allocating users to telephone extension numbers assists in producing more meaningful reports as calls are assigned to users. This is essential for users who make use of popup account billing. The system must be able to assign calls to users for the popup to appear at the correct workstation.
- Home folder: Konica Minolta printers will add a Home button to the scan destination favourites if the ‘scan to home’ settings have been configured on the printer, and a home folder path has been imported for the logged in user.
- Secondary login name: If a user sends jobs to a print server using more than one profile (e.g. an ‘admin’ account as well as a ‘daily’ account) these jobs can be matched to the same user record by putting the username in the Secondary login name. This way, the user can release jobs using the same PIN/card no matter which profile sent the jobs.
- PBX name: The name of the pre-defined PBX record on which imported extensions will be created.
- PBX PIN: If users dial a PIN number to make a call, the call can be assigned to the user based on this PIN number instead of only the extension number.
After user created actions
If a user is created during a sync, we can perform some actions so the user can immediately log in to printers:
- Auto create PIN: This will automatically create a PIN number if the Controller User ID (PIN) user field is not mapped, or the mapped attribute value is empty. The number of characters is specified in the System Configuration. See Menu bar > Tools > System Configuration > General tab > Auto setting user PINs frame > Auto PIN length box.
- Send welcome email: If this is enabled, the new user will receive an email based on the template specified in the drop-down. This email could contain their new PIN number and instructions on how to log in to a printer to release jobs.
Test Settings
Once all the settings have been defined, click the Test Settings button. This will not make any changes to the database; it will import all the users (based on the membership requirements) and show the values of the mapped attributes.
You can make changes to the attribute mapping, group membership requirements and Department actions and click Test Settings again to see the effects of these settings changes.
Execute the Microsoft Entra ID Sync now
If you want to execute the import immediately instead of waiting for the automatic execution based on the schedule, follow these steps.
- Open Resource Manager.
- Navigate to Scheduled Tasks > Microsoft Entra ID Sync.
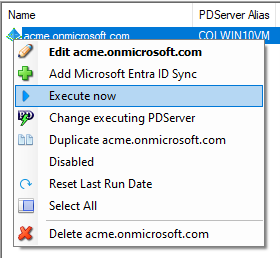
- In the right-hand pane, right click the Microsoft Entra ID Sync and choose Execute now.
Now wait a minute or two and then click the refresh button: ![]()
Check the value in the Last message column. It should give a summary of how many users were imported, created and deleted.
|
Document revision date: 2025/01/27 |
