Konica Minolta Setup Guide
1 Ensure the SSL and network settings have been completed in the printer web interface
For eSeries devices, follow this guide.
For iSeries devices, follow this guide.
2 Configuring the Device in Resource Manager
To enable the integrated applications on the MFP, Resource Manager needs to connect to the MFP and receive responses from the MFP.
2.1 Initialising Konica Minolta Integrated applications
To push the embedded apps to the device, follow these steps:
- Open Resource Manager (Start > Programs > Print Director 2 > Resource Manager).
- In the tree view, navigate to Print Management > Shared Devices.
- If a definition for the MFP in question has not already been created, follow these steps. Otherwise double click the existing device and skip to the next step.
- In the right-hand pane, click Add.
- Enter a descriptive name in the Device Name text box.
- Enter the IP address of the MFP in the Host or IP text box.
- Click the Ping button to ensure that the device is accessible over the network.
- Click the Controller tab.
- In the Controller Type drop down, choose Konica Minolta Integrated.
2.1.1 General Tab

2.1.1.1 PDServer IP Address
Firstly, ensure that the PDServer IP address is correct. This IP is obtained by doing a DNS resolution on the Managing PDServer hostname for the Device. If the workstation has multiple network adapters it is possible that this IP address is inaccessible from the MFP. If the IP is not correct, click the Resolve button. The IPs for each adapter will appear in the drop down. Choose the correct IP address from the dropdown.
A hostname can also be entered instead of the PDServer’s IP address. This allows for servers whose IP addresses change frequently (i.e. DHCP allocation). If a hostname is entered, the device must have DNS settings that will resolve the server’s hostname.
2.1.1.2 Secondary PDServer
A Secondary PDServer can be configured as an option. When a user logs on to the MFP, it will attempt to connect to the Primary PDServer. If no response is received within the timeout (default is 20 seconds) a Connection Error message will be displayed on the MFP front panel. If a Secondary PDServer has been configured, instead of showing a Connection Error message, it will attempt to connect to the Secondary PDServer.
If a Secondary PDServer is to be configured, tick the checkbox and choose the PDServer from the drop down. Ensure that the correct IP address is displayed.
2.1.1.3 Comment requirement
An extra field can be added to the login screen of the MFP to allow the user to enter a comment. This comment will be recorded against any transactions made while logged in. The comments will be displayed in the reports and can be used when importing into legal accounting systems.
If a comment is entered in the printing popup on the user’s workstation, the one entered in the popup will take preference.
2.1.2 Printing Tab

2.1.2.1 Secure Document Release and “Follow me” printing
If Secure Document Release (jobs are held until user requests the print at the MFP after authentication) is going to be used on this MFP, tick the Enable Secure Document Release checkbox. This means that jobs will be held at the print server (or workstation under direct-to-ip printing) until the user releases them at the MFP.
If the client would like to release jobs sent to other MFPs (Follow Me printing) set the Follow me printing drop-down to Enabled. All MFPs that use compatible drivers should be put in the same Pull print Group. You can leave the device in the <unallocated> group if they are all compatible. Otherwise, create a new Pull print group.
To create a Pull print group, click the ![]() button next to the Pull print group drop down. Here one can create/edit/delete Pull print Groups. Ensure this MFP is placed in the Pull print group that contains other MFPs that have compatible drivers.
button next to the Pull print group drop down. Here one can create/edit/delete Pull print Groups. Ensure this MFP is placed in the Pull print group that contains other MFPs that have compatible drivers.
The Release method drop-down specifies whether the user is shown a list of their jobs after they log in, or whether all of their jobs will be immediately released straight after log in.
Jobs can be displayed and released in a particular order depending on the option chosen in the Release jobs in order of drop-down.
If this printer is a mono printer, you could choose to show only mono jobs by choosing that option from the Show mono or colour drop-down. This would prevent the user from mistakenly releasing some of their colour jobs on a mono printer. If this is a colour printer, you could select Only show colour jobs to prevent users from releasing mono jobs at this printer which might have a higher cost per mono page than a dedicated mono printer.
2.1.2.2 Print Job Tracking
By default, print jobs are tracked using Enhanced server counter notification. The other option is Datastream interpretation which reads the spool files that passes through queues that are matched to devices. There are pros and cons to each method.
Track print jobs via Enhanced server counter notification (OpenAPI print tracking)
This is the recommended method for tracking print jobs because it is close to 100% accurate. It also allows for spool file authentication which means no one can bypass the software and print directly to the printer. Ensure that the Override driver authentication by inserting into datastream… checkbox is ticked.
If the printer is fitted with a Fiery controller, then Enhanced server counter notification will not be supported.
Track print jobs through print queues (datastream tracking)
These are the disadvantages to datastream tracking:
- There will be a 5% variance in the total pages printed compared to the meter reports (i.e. what was actually printed). This is because once the job has left the print server (or workstation in direct-to-ip printing) the software records the transaction. If the job is subsequently deleted at the MFP the transaction will not be removed.
- There will be a larger colour variance because the datastream interpretation detects a whole job as colour even if it has only one or two pages of colour.
2.1.3 Authentication Tab
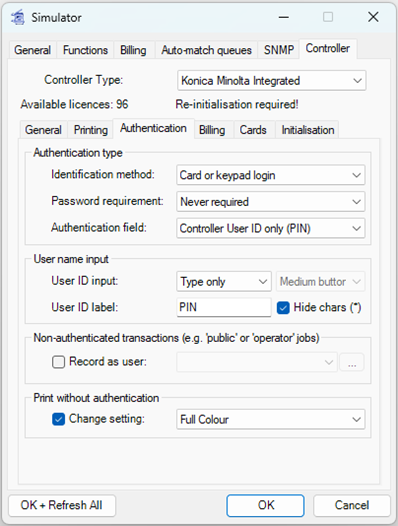
2.1.3.1 Authentication type
In the Authentication type frame, choose the method by which users will be authenticated (card or keypad login or both). Also, choose the password requirements from the Password requirement dropdown. Note that if users will be entering a PIN number, set the password requirement to Never required.
The Authentication field dropdown specifies which database field is used to match a user. By default this is the Controller User ID. This can be changed to the Login Name (AD Account) or both.
2.1.3.2 User name input
In the User name input frame one can specify how the touch-screen entry of the User Name can be accomplished. The User Name can be typed, selected or searched. One can also change the label on the User Name button and hide the characters of the User Name with asterisks, similar to a password field.
2.1.3.3 Non-authenticated transactions (e.g. ‘public’ or ‘operator’ jobs)
These transactions include prints such as configuration pages printed from the device admin menus and scan or fax logs. They also include user-initiated copies or scans if they are allowed without authentication (i.e. Print without authentication = Full Colour).
If the Record as user is unticked, these transactions will not be recorded.
To have these transactions recorded, tick the checkbox Record as user and choose the user from the drop-down menu or click on ![]() to search for the user.
to search for the user.
2.1.3.4 Print without authentication
When set to Restrict, it guarantees that only jobs sent by PDAgent will be printed. It prevents the system from being bypassed. The print data must contain valid authentication information before will be allowed to print.
If it is set to Full Colour or Black Only, jobs that do not contain authentication information will still be printed, and the system can be bypassed.
2.1.4 Billing Tab

This tab is only relevant for sites using the PD Pro version of the software.
Print, copy, scan and fax transactions can be billed to third party accounts and Matters. On this tab the user specifies what billing fields are displayed on the front panel of the MFP.
2.1.4.1 Billing information requests
If Place billing fields on Second screen (after login) is selected, the account, matter and comment fields will not appear on the Login Screen which is the standard idle screen of the printer. They will appear on a screen that is displayed immediately after the user logs in.
The advantage of this is that if the billing fields’ requirement is set to User popup setting, certain users may not see the second screen at all. If a user’s popup setting is set to No client popup or Popup invoice only they will not be shown the second screen and they will be logged-in straight away. This leads to less confusion and quicker login for users who do not need to bill jobs to accounts.
If a printer is using card-swipe login, and the billing fields are on the initial screen, the user must remember to enter the billing information before they swipe their card. If the fields are on the second screen, the user can swipe first and then enter the billing information when the second screen is displayed.
Lastly, using the second screen allows the printer to filter out accounts that the user does not have access to when they search or list accounts. If it is on the initial screen, the software doesn’t know who the user is when they search for accounts so the results will contain accounts to which they do not have access.
Always request billing info even when jobs are available for release that already have billing info
If this option is not ticked, billing info will not be requested if there are jobs waiting that already have billing info from the pop-up. The assumption is that the user would be logging in to release their jobs and does not need to be asked for billing info again. However, this means that if the user does not release their jobs and would like to perform other actions, such as copying, they will not be able to.
If this option is ticked, the printer panel will prompt the user for an Account Code even if the user has already entered an Account Code in the printing pop-up. This means that billing information is always requested, allowing users to perform other tasks like copying, without being forced to wait for their print jobs. However, if they are only releasing jobs, the request for billing info will be displayed unnecessarily.
Allow job release with incomplete billing info
If this is ticked it will allow jobs to be released even without billing information. So if the user hasn’t entered billing information in the print pop-up, and if they didn’t enter billing information on the device, they would still be able to release their jobs.
2.1.4.2 Account Code
If the Account Code requirement is set to No Account Code entry, the field will not be displayed on the MFP front panel. Also, the Matter Code field will not be displayed. This means that all transactions will be billed to the user’s auto-bill account depending on the auto-billing setting for that user. It can be set to Account Code optional, in which case it will be displayed but can be left blank and the auto-billing setting will apply. Also, it can be set to User popup setting so if the particular user’s popup setting is No client popup or Popup invoice only they can leave the field blank.
In the Account Code input method one can specify how the touch-screen entry of the Account Code can be accomplished. The Account Code can be typed, selected or searched. One can also change the Account Code field label (e.g. Project Num).
2.1.4.3 Matter Code
Similarly to the Account Code requirement, the Matter Code field can either be not displayed, optional, required or User popup setting.
2.1.5 Cards Tab

If users should be able to self-register their cards, select how the users will be identified from the Self-register cards drop down. If self-registering is disabled, choose Not allowed.
Self-registering will happen when a card is swiped, and its number is not assigned to a user.
The Try to detect card reader settings checkbox is a deprecated option and it is not recommended to be enabled. Rather perform a few card swipes after initialising the device and then use the View swipes button to see how the card data is being interpreted. If you know what the card number should be (either printed on the card or retrieved from an access control system) you can set the byte ordering and bit positions, so the same number is extracted.
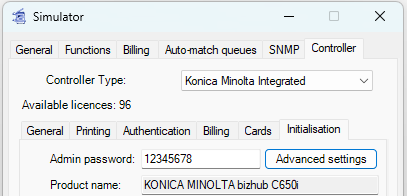
2.1.6 Initialisation Tab

Once all the settings have been specified, the integrated applications can be initialised. Note that if any of the settings are changed after initialisation has taken place, the applications must be re-initialised.
Ensure the correct “Admin” user password is entered. Click the Gather Info button to confirm connectivity to the MFP and to confirm that no integrated applications have already been installed. If any applications appear in the list, highlight any conflicting applications and click the Delete Application button. Click the Initialise button.
Inspect the output in the bottom textbox. This will show if any of the stages of initialisation failed. If there were any failures (e.g. because of a timeout), delete the applications and try again.
Once successful initialisation is complete, click the OK + Refresh All button. Now test the connectivity by logging in at the printer panel, or via the printer’s web interface:
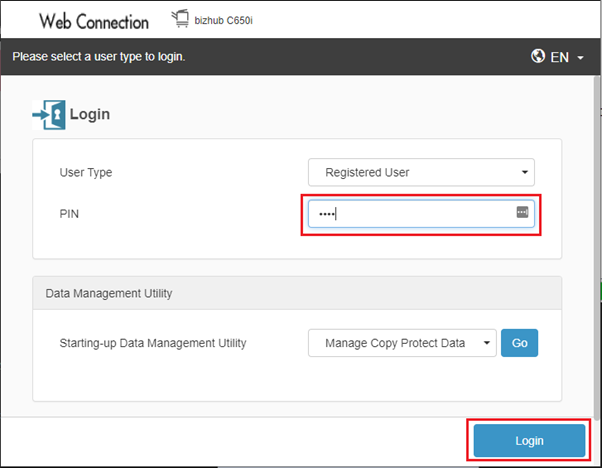
If there are any connectivity problems, ensure that the PDServer service is running (and no firewalls are blocking port 50002) and that the integrated applications were initialised with the correct PDServer IP address.
2.1.7 Advanced Settings
On the Initialisation tab, click the Advanced settings button.
2.1.7.1 General Tab
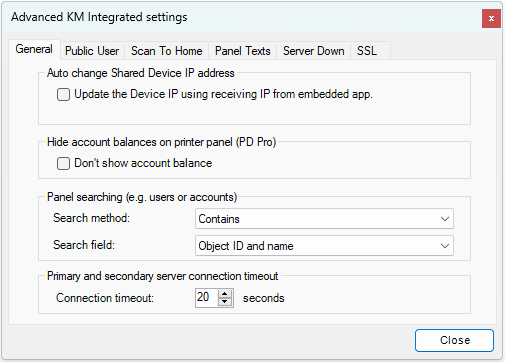
Auto change Shared Device IP address
If this checkbox is ticked, it means that the next time the printer connects to the server (e.g. a user logs in) the software will check the Shared Device’s IP address and compare it to the IP address from where the connection came. These should normally be the same. However, if the printer’s IP address has changed (because of DHCP or manual change) it will be different to the one specified for the Shared Device.
The advantage to ticking this checkbox is that the Shared Device IP address will automatically be updated if the physical printer’s IP address changes. This means that queues can be matched correctly, and future initialisations will connect successfully.
If, however, the printer connects to the server through a router using NAT, the IP that the server will ‘see’ will be that of the router and not the physical printer’s IP. In this case, this checkbox must be unticked. Otherwise, the IP address for the Shared Device will be changed to that of the router.
Hide account balances on printer panel (PD Pro)
This setting only applies to PD Pro licences. If the software is used for student billing, leave this checkbox unticked. The user will then see their balance on the printer balance after they log in. If the software is used for client billing, tick this box because the account balances will be irrelevant.
Panel searching (e.g. users or accounts)
This affects the way items are searched. If a search control is used for Users, Accounts or Matters the default search method is Contains. This means that if a user is searching for an account called Johnson, and enters son, the account will be shown in the results. If it is Starts With, son will not be matched.
Search field affects which field is searched. Normally for a User search, only the Controller User ID field is searched. For example, if a User’s Controller User ID is JOHSMI001 and their full name is John Smith, when the user searches it will only match characters contained by JOHSMI001. So if they search for John it will not match unless the setting is changed to Object name or Object ID and name. Similarly, for an Account search it will only match Account Codes by default. If the setting is changed to Object name or Object ID and name it will search using the Account Names as well. This is especially useful when the Account Codes are numbers which are difficult to remember. It is much easier for the user to search on the Account Name.
Here is the definition of Object ID and Name for each object type:
- User: Object ID = Controller User ID Object Name: User Full Name
- Account: Object ID = Account Code Object Name: Account Name
- Matter: Object ID = Matter Code Object Name: Matter Name
Primary and secondary server connection timeout
This specifies how long the device should wait for a response from the server before showing an error.
2.1.7.2 Public User Tab
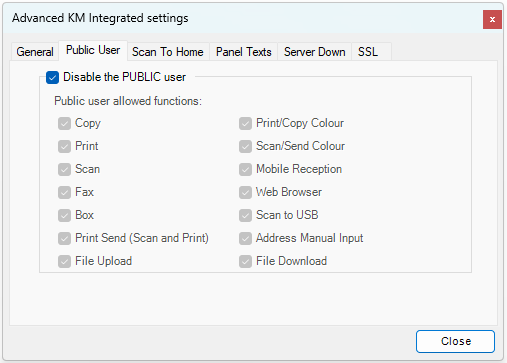
By default, the Public User is disabled when initialising the device. Sometimes there may be a reason to enable the Public User and allow certain functions to be executed under the Public User account. For example, if users would like to be able to scan to email without logging in, untick Disable the PUBLIC user and then untick all the functions except for Scan, Scan/Send Colour and Scan to USB:

2.1.7.3 Scan To Home Tab

These credentials must have ‘write’ access to all the users’ home folders on the server. If the user has their Home folder field populated, either manually or via an LDAP Sync, they will see a Home button in the printer’s address book. If they select this button and scan, the file will be saved in this folder.

2.1.7.4 Panel Texts Tab
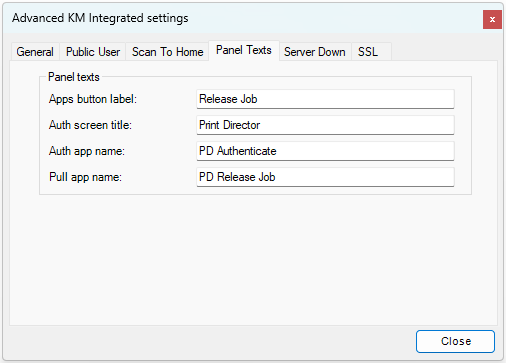
The Apps button label will be shown under the Release Job app when the user presses the Home button.
The Auth screen title is shown just above the login buttons:

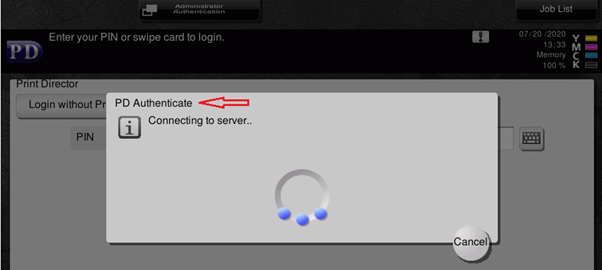
The Auth app name is shown when the user has entered their credentials and the device is connecting to the server:
The Pull app name is shown when the Release Jobs app is connecting to the server (i.e. if the user logs in and they have jobs waiting to be released):
It is also shown if there is more than one OpenAPI application on the device (e.g. Doc Navigator) and the user goes into the Apps menu.
2.1.7.5 Server Down Tab
The embedded app on Konica Minolta is configured with a primary and, optionally, a secondary PDServer address. When a user tries to log in at the device, it must successfully connect to either the primary or secondary servers. If both connection attempts fail, the user will not be able to log in to the printer.
Konica Minolta printers that support function version 4.2 and greater, have a Cache Function. When enabled, it will store the users’ login details for a specified period of time (30 days by default). If the PDServer is inaccessible, the printer will go into Server Down mode. When in Server Down mode, any user that has logged in within the previous 30 days will still be able to make copies or scans. They won’t be able to release jobs printed from their computer, but they can print from a flash drive plugged directly into the printer. All transactions made while in Server Down mode will be automatically uploaded once the PDServer is available.
These settings govern how long cached info is kept, and how much limited users are able to print.
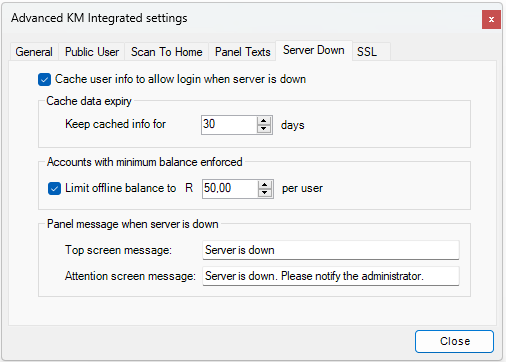
Cache data expiry
This sets the number of days that user login information will be cached. So any user that tries to log in while in Server Down mode will only succeed if they logged in previously within the number of days specified.
Accounts with minimum balance enforced
If the Limit offline balance to checkbox is ticked, it means that any user that logs in who has a credit limit enforced will be allocated that balance specified in the text box. For example, a user named John Smith is a student with an enforced minimum balance of 0.00. When this user logs in while the device is in Server Down mode, they will be able to make prints and copies up to a total of 50.00 no matter what their actual account balance is. Another user named Jane Doe is a staff member that doesn’t have a minimum balance enforced. Jane will not be limited when making prints and copies while the device is in Server Down mode.
Panel message when server is down
- The messages are shown on the printer panel. The Top screen message will be displayed on the login panel in the top right:

- The Attention screen message will be displayed when the user touches the exclamation icon:

Then the attention messages will be displayed:

2.1.7.6 SSL Tab

It is recommended to always have Use system default setting ticked. Custom settings should only be used for troubleshooting purposes.
If you have made any changes to the Controller Tab, click OK + Refresh All to update those changes.
2.2 Changing settings that require re-initialisation
If any of the settings on the Controller tab are changed after the integrated applications have been initialised, a delete and re-initialise may need to be performed. Any changes to the following settings will require a re-initialise:
- Primary or secondary PDServer IP address
- Server connection timeout
- Applications button label
- Authentication type
- User name input
- Account Code (all settings except Exclude User Accounts…)
- Matter Code (all settings)
To re-initialise:
- Double click the MFP in question under Shared Devices in Resource Manager.
- Click the Controller tab.
- Click the Initialisation tab.
- Ensure the correct password is entered in the “Admin” password textbox.
- Click Gather Info. After some communication with the MFP, two entries will appear in the application list.
- Click Initialise.
3 Configure the MFP and print drivers for datastream print tracking
For datastream print tracking to take place, all authentication for printing must be disabled on the MFP and on the printer driver.
Note that this is only necessary if you are using Datastream tracking (perhaps because of a Fiery controller).
3.1 Disable User Authentication on the printer driver
NB: not necessary under Enhanced Server tracking.
On the print server, open Printers and Scanners, right click the printer and choose Properties. Click the Configure tab. Click the Obtain Settings… button (bottom left) and untick the Auto checkbox and click OK.

In the Device Option frame, scroll down to User Authentication, set it to Disable.

4 Troubleshooting
4.1 Timeout occurs when initialising integrated applications
- Ensure that SSL has been enabled on the MFP and the OpenAPI and TCP Socket Settings have been correctly configured on the MFP.
- Ensure that the Shared Device has the correct IP address configured:
- Open Resource Manager.
- Click Print Management > Shared Devices.
- Double click the device in the right-hand pane.
- On the General tab ensure the correct IP address appears in the Host or IP text box. Click the Ping button to confirm network connectivity.
- Open web browser and browse to the IP address to confirm that it is the correct device.
4.2 Panel displays Connecting to Server continuously until timeout
- Ensure that the PDServer service is running on the server.
- Ensure that TCP port 50002 is not blocked by a firewall on the server.
- Ensure that TCP port 50002 is not being used by another process:
- Open a Command Prompt.
- Type netstat -a -o and hit enter.
- In the list of open ports, look for TCP port 58002. Note the PID in the PID column.
- Open the Task Manager.
- Click the Details tab.
- Ensure the PID column is displayed. If not, right click on the column headers and choose Select columns and tick the PID (Process Identifier) checkbox.
- Look for the PID noted in the netstat list and ensure it is PDServerService.exe. If it is another application, either this application must be terminated (and PDServer restarted) or the port that PDServer listens on must be changed. To change the port that PDServer uses to listen for OpenAPI communication, follow these steps:
- Open Resource Manager.
- In the menu bar click Tools > System Configuration.
- Click the Networking tab.
- Enter the new port number in the PD Server – KM Integrated port checkbox.
- Refresh the PDServer.
- All MFPs that have KM Integrated applications registered will have to be re-initialised. See Changing settings that require re-initialisation.
- Ensure that the integrated applications were initialised with the correct PDServer IP address and that the PDServer’s IP address has not changed since initialisation. See Changing settings that require re-initialisation.
4.3 Print jobs appear in the job list on the panel, but are deleted
If a print job arrives at the printer but is not printed, check the Job History list to see what caused the problem:
- Touch the Job List button in the top left of the panel.
- Touch the Job Details button in the bottom left.
- Touch the Job History button.
- If there are any jobs in this list that have a status of Deleted due to error, highlight the job and touch Detail.
- If it says Login Error in the Detail screen, it means that the print job couldn’t be authenticated on the PDServer. Under Enhanced Server tracking, it may be that this job is not going through the server (i.e. direct to IP printing). Or under Datastream tracking, Print without authentication may be restricted – see Configure the MFP and print drivers for datastream print tracking
Document revision date: 2024/08/05
