Queue Deployment Configuration
Queue Deployment requirements
- PDAgent must be installed on user computers.
- Only Windows operating systems are currently supported.
- Print drivers must be ‘package aware’.
- Only print queues with Standard TCP/IP ports are currently supported.
Queue Deployment features
- Copy a print queue, including all printer settings and user printing preferences, and auto-deploy it to other computers.
- Auto-deploy to computers by individual PDAgent selection, user selection, Department membership, IP range or hostname search.
- Keep deployed queues up to date. Driver changes and user preferences, such as setting the default to double-sided printing, will be automatically pushed to all user computers.
Creating Queue Deployments
Queue Deployments can be created in two ways:
- Copy an existing print queue: See How to copy an existing Windows print queue to a new Queue Deployment.
- Creating manually: See How to manually create a Queue Deployment.
Name, updating, deleting and deployment scope
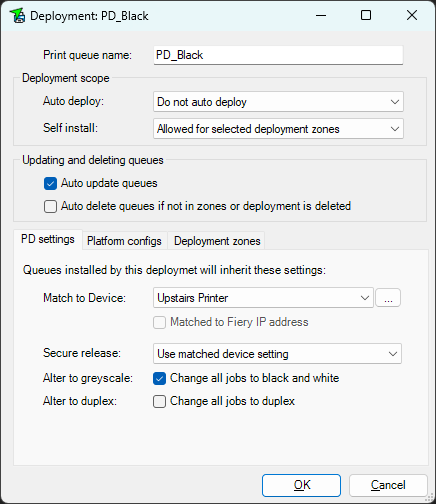
Print queue name

This will be the name of the printer on the user’s computer once it is installed. If a print queue already exists on the user’s computer with the same name, it will be linked to this Deployment and fully updated according to the Deployment’s settings.
If two Queue Deployments are created with the same Print queue name, ensure that these are deployed to zones that are mutually exclusive. The only reason to have more than one Queue Deployment with the same name, is if the different zones should have different settings (e.g. colour default) but have the same printer name. Otherwise it should be avoided.
Deployment scope
This is where we define how we want the print queues to be installed.
Auto deploy

The Auto deploy setting governs how print queues will be installed without any user intervention.
- Do not auto deploy: The print queue will not be automatically installed.
- Deploy to all PDAgents: Install the print queue on all PDAgents.
- Selected deployment zones: Install the print queue to computers that match to any of the zones selected on the Deployment zones tab.
Self install

The Self install setting controls who will be able to use the right-click Install printer functionality on their computer. See How to self-install a print queue from a Queue Deployment.
- Not allowed: This print queue will not appear in the list of available queues to self-install.
- Allowed for all PDAgents: This print queue will appear in the list of available queues to self-install on all computers that have PDAgent installed.
- Allowed for selected deployment zones: It will only appear in the list on computers that match to any of the zones selected on the Deployment zones tab.
Note that the Self install setting will be greyed-out if the Auto deploy setting is set to Deploy to all PDAgents. This is because the user won’t have the opportunity to self-install because the queue will already have been auto-installed.
Only queues that are not yet installed will be shown in the right-click Install printer list on the user’s computer. If there are no queues available for install, the right click option will not appear in the menu.
Updating and deleting queues

Auto update queues
If this is ticked, print queues on computers that are linked to this deployment will have their settings updated to match those stored in this deployment.
- Example 1: The PD_Colour queue is deployed to John and Jane’s computers. After this, Jane changes the default duplex setting to single sided in her printing preferences. To apply this setting to John’s computer, we can update the deployment by copying the new settings from Jane’s computer. See How to update a Queue Deployment from an existing Windows queue.
- Example 2: A new driver version is released. The driver is changed in the printer properties on Jane’s computer. The deployment is then updated from Jane’s computer. The next time John’s PDAgent refreshes, the driver will be changed.
Auto remove queues if not in zones or deployment is deleted
If this is ticked, print queues will be removed from computers if the deployment is deleted. Also, if the print queue was auto-deployed because the computer matched to one of the selected zones, it will be removed if it no longer matches to a zone. For example, if the Deployment Zone matches specific user logins, and the user logs out, the print queue will be removed. When the user logs back in, it will be re-added. This will not apply to queues that were self-installed or manually installed.
PD settings
All installed print queues have settings that govern how the PDAgents handle jobs sent to these queues. When new queues are deployed by a Queue Deployment, the settings for the new queue will be initialised using the settings on this tab. Note that after a queue is deployed, the settings can be changed on the print queue to differ from the Queue Deployment settings if desired.

Match to Device
If set to <not matched>, deployed queues will be ignored by PDAgent. Otherwise they will be controlled based on the matched device’s settings.
Matched to Fiery IP address
If the matched device has a Fiery controller, this checkbox will be available. When ticked, jobs sent to these queues will be sent to the Fiery IP address as opposed to the printer’s IP address.
Secure release
The default setting is Use matched device setting. So when Secure release is enabled on the matched device, print jobs will wait to be printed until the user releases them after they log in to the device.
However, there may be some instances where a print queue is needed that overrides the matched device’s secure release settings and releases jobs immediately. For example, dispatch notes may be sent to a queue from SAP which should be immediately printed for drivers to collect. In this case, the Secure release drop down would be set to Release jobs immediately.
Alter to greyscale
All jobs sent to a queue with this setting ticked will be altered to greyscale.
Alter to duplex
All jobs sent to a queue with this setting ticked will be printed on both sides of the paper.
Platform Configs
On this tab, we can define the configurations for different platforms. Currently, PD supports both Windows x86 and Windows x64 platforms. If there are computers running Windows x86, then a Platform configuration must be created for Windows x86. Otherwise, only Windows x64 is required.

Platform configuration
This is where the configuration for the specific platform is set up.

Driver
If we change the driver here, the driver will be changed on all linked queues. However, driver specific settings and printing preferences will be set to default.
Note that you could also change the driver by clicking the Copy settings now from queue button and choosing a queue that has a different driver. This will update the Queue Deployment driver as well as copying any printer settings and printing preferences.
Last copy settings
This will show when this Queue Deployment last copied a print queue’s settings and which queue was used for the copy.
Copy settings now from queue
A window will be displayed where an installed print queue can be selected. Then it will connect to the PDAgent on the computer that has the print queue installed and download all the driver and printer settings, as well as user printing preferences. These will be saved in the Queue Deployment. If configured to do so, all linked print queues will be updated with these new settings.
Overwrite driver data
This setting will apply if the Queue Deployment is configured to keep print queues updated.
- Last copy is newer than the last queue update: When a print queue is deployed, and when it is updated, the date of the update is recorded for the queue. If a Queue Deployment copies settings from a queue, it will have a new Last copy settings Then all queues which have an update date that is older than the Queue Deployment update date will have their driver data overwritten and the new update date will be recorded.
- Every refresh: Sometimes users change driver settings which might not abide by IT policies. This setting will overwrite the driver settings every time the PDAgent refreshes whether or not Queue Deployment has been updated.
- Do not update: Perhaps there is a reason for driver settings not to be updated ever. This would allow users to change their driver settings without worrying about them being altered.
Override user printing preferences
Similarly to the above, user printing preferences will only be overwritten if the Queue Deployment is configured to keep print queues updated.
The settings in this drop down, behave in the same way as described above for the driver data.
Win queue settings
These are the standard Windows print queue settings. Linked queues will always be updated using these settings as long as the Queue Deployment has keep print queues updated enabled. It doesn’t matter when the Queue Deployment was last updated because these settings can be compared and changes detected. This is unlike driver data or user printing preferences which is proprietary and cannot be interpreted and compared.
Set print queue as default printer
If this is ticked, the queue will be set as the default printer for all users on the computer to which it is deployed. Note that Windows 10 and 11 has a feature called Let Windows manage my default printer. This feature prevents setting a default printer and will be disabled if the Set print queue as default printer checkbox is ticked.
Printer is shared
This will set the printer as ‘shared’ and it will require a share name to be entered.
Location and Comment
These are standard Windows print queue fields that add information to print queues.
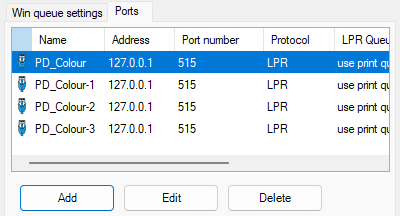
Ports
This tab will show a list of ports that will be created for the deployed queues. When there is more than one port, it means “printer pooling” will be switched on for the deployed queues. The only reason to have more than one port is if this queue will only be deployed to print servers and shared. When a print server queue is shared, many users print to the queue via Windows SMB printing. If a print server queue only has one port, and a user with a very slow network connection prints a large job, any jobs submitted after the slow user’s job will wait until the slow user’s job is complete before theirs can be printed. This would make sense if one print queue only printed to one physical printer. But it doesn’t make sense in a “follow me” environment where one print queue is used but the jobs can be released at many printers. If a slow job is spooling (or in an error status), other jobs arriving in the queue will be allocated the next available port so they won’t have to wait.
The example below shows a queue intended to be deployed to print servers, not end user computers which would only need one port because it is only used by one user.
Standard TCP/IP Port
Adding or editing a port will open the port settings form.

Port name
When a new port is created, the name of the port will default to the name of the print queue with a “PD_” prefix. If the queue name already has a “PD_” prefix like the example above, it won’t add another prefix.
The “PD_” prefix has an effect on the way the PDAgent will control the queue. Normally, if the Address points to localhost (i.e. 127.0.0.1), then the PDAgent will know that the job will be received by the PDAgent LPD service and it will not ‘pause’ the print queue. However, we might want to deploy queues with an Address that points to a server’s IP address. This is to avoid jobs waiting on the user’s computer for release. In this case, the Address will not point to localhost so it should have the “PD_” prefix for the PDAgent to assume it will be received by the PDAgent LPD service on the server.
Address
This will default to localhost (i.e. 127.0.0.1) which means the jobs will be received by the local PDAgent and will wait at the local computer for release.
When jobs wait at the user’s computer, it means their computer must be online at the moment they release their job at the printer. If, for example, they have not plugged their laptop into power, there is a chance it will go to ‘sleep’ while they walk to the printer. Then the printer will inform them their job cannot be released since the PDAgent is unreachable. To avoid this, you could enter the IP or hostname of the server in the Address field.
Protocol
This should be set to LPR so the jobs can be received by the PDAgent’s LPD service. If it is changed to RAW, it means the PDAgent can only control the queue by keeping it ‘paused’.
Set LPR queue to print queue name
When the PDAgent LPD service receives a print job, it must assign the job to a print queue so it knows all the settings to be applied. The PDAgent will use the text in the “LPR queue” field supplied by the LPR protocol to assign it to a print queue. If this checkbox is ticked, the port settings will always be updated so the “LPR queue” matches the print queue name, ensuring the PDAgent always assigns jobs to the correct queue.
LPR Byte Counting Enabled (double spool)
If this is ticked, all the job data must arrive in the queue before Windows starts sending data through the port. It is recommended to keep this unticked, so the PDAgent immediately starts receiving the job data.
SNMP Status Enabled
When ticked, Windows will try to connect to the printer via SNMP using the Address. If it can’t connect, the print queue will have an ‘offline’ status. Since the Address will normally point to localhost or a print server, Windows will mark the queue as ‘offline’ so it is recommended to keep this checkbox unticked.
Deployment zones
When Auto-deploy or Self-install scopes are set to selected deployment zones, we must select the zones on the Deployment zones tab. If a computer or user is matched to any of the selected zones, they will receive the queue deployment when Auto deploy is set to Selected deployment zones, or they will be able to self-install when Self install is set to Allowed for selected deployment zones.

In the example above, a computer will receive a queue deployment if it matches to either the Building B or Executives zones. The Building B zone defines an IP range search parameter while the Executives zone specifies any user in the Executives department (no matter what the computer IP is).
Zones can be added, edited and deleted here, but it must be kept in mind that zones can be assigned to more than one Queue Deployment. So changes made to a zone could affect another Queue Deployment that is using the same zone.
Deployment zone configuration
This is where we will specify the search parameters that will define whether a user or computer is included or excluded from a zone.
Note that if more than one type of search parameter is specified, a user or computer must match to both to be included. For example, if you specify an IP range as well as specific User logins in the same zone, the user’s computer must be in the IP range AND their login must be selected in the User logins list.

Deployment zone name
Ensure a descriptive name.
Include or exclude
The default setting is Only include those matching search parameters. This means, to be included in the zone, the user or computer must match the search parameters.
However, there may be cases where users or computers should be included if they don’t match search parameters. For example, perhaps a network already has all the print queues manually installed. Now the IT administrator creates a Queue Deployment so they no longer need to manually install printers. However, they don’t want the Queue Deployment to install queues on the computers they’ve already done manually. So, they would set the Include or exclude drop-down to Include all except those matching search parameters. Then they would set the Match hosts drop-down on the Hosts tab to Specific PDAgents and tick all the existing PDAgents. Now, only new PDAgents that are installed will receive the deployment because they won’t be selected in the list.
Hosts
On this tab we can define search parameters that are based on the hostname of the computers.

Match hosts: All hosts
This means that no matching relating to hostnames or specific PDAgents will be conducted.
Match hosts: Specific PDAgents
This will allow you to specify specific PDAgents to match to this zone. Right click the list to tick more than one PDAgent at the same time.
Match hosts: Hostname starts with
In the text box, we can enter a comma separated list of text values. For a computer to match, the hostname must start with any of the text values specified.
Match hosts: Hostname ends with
Similarly to the above, for a computer to match, the hostname must end with any of the text values specified.
Match hosts: Hostname contains
For a computer to match, the hostname must contain any of the text values specified.
Match hosts: Regular expression (advanced)
This is for advanced users who know how to write regular expressions. In this case, it is not a comma separated list, but a valid regular expression that can match hostnames in any number of ways.
IP range
Here computers can be matched based on the IP address of any of their network adapters.
Match IP addresses: All IP addresses
This means the IP address of a computer will not be used for matching.
Match IP addresses: Those in the range(s) specified below
A comma separated list of ranges can be specified using any of the following formats:
- Single address. Example: 192.168.0.100
- Begin and end range. Example: 169.254.0.0-169.254.0.255
- CIDR notation IP v4. Example: 10.0.0.1/24
- CIDR notation IP v6. Example: fe80::%lo0/10
- Bit mask range. Example: 192.168.0.0/255.255.255.0
The IP address of any network adapter of a computer must be within any of the ranges specified to be matched.
User logins
On this tab we can specify that this Queue Deployment will match to a computer based on the user that is currently logged in.
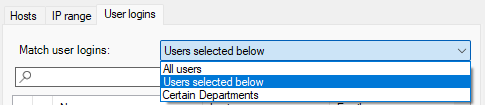
Match user logins: All users
This means that the user login will not be used for matching.
Match user logins: Users selected below
If any user that is ticked in the list logs in to a PDAgent, the computer will be matched to this Queue Deployment and the queue will be installed. It does not matter how the user logs in to the PDAgent, whether it’s automatic using the Windows account, or manually using a PIN or username and password.
Right click in the list to tick more than one user at a time.
Match user logins: Certain departments
Similarly to the above, if a user that is a member of a Department is ticked in the list, their computer will receive the queue deployment.
Document revision date: 2023/08/30
Software version: 2.4.5.0
