Auto-configure queues to use the PDAgent LPD service
By default, any Windows print queue that is ‘Matched to device’ will be controlled by the PDAgent. This means the spool data is accessed by reading the spool file while the job waits for the release command from the PDAgent. This has a few disadvantages:
- The jobs get paused as they arrive in the queue. On Windows 8/10, the users then receive an operating system popup message stating their job is ‘paused’. This can cause confusion for the user and unnecessary IT support tickets being created.
- On a print server, the jobs waiting in the queue in the ‘paused’ state are visible to other users who are connected to the same queue. This may raise some confidentiality concerns as document names and usernames are visible.
- Some drivers don’t convert the GDI print data (e.g. V4/Class drivers) until the jobs are sent through the printer port. This means the PDAgent won’t be able to insert the authentication data into the datastream required for post-tracking support (e.g. Enhanced Server).
- Some Microsoft applications (e.g. Edge, Photos) use the new XPS print path. This results in a similar problem as the V4 drivers (i.e. XPS data in the spool file). PDAgent does have a workaround to support this but using the built-in LPD service resolves this problem altogether.
Configuring the PDAgent
Before we set the queues to be auto configured, we must ensure the LPD service on the PDAgent is enabled and ensure a queue that is matched to a device exists.
Ensure a print queue exists that is matched to a device
When the PDAgent receives a job from LPR, it needs to know which print queue it should use for the job’s processing (i.e. the device settings for the queue’s Matched Device and whether to send to the device’s main network adapter or the Fiery adapter if it has one). First it will try to match a queue using the Queue field it receives from LPR. If it can’t match a queue it will simply use the first queue it can find that is matched to a device.
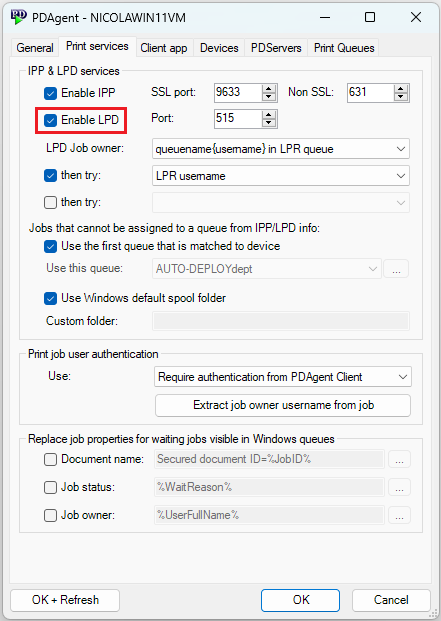
Ensure the LPD service is enabled on the PDAgent
On the PDAgent, ensure that the LPD service is enabled:
Set the queues to auto change to local LPR ports
There are two ways to set queues to auto-change to local LPR. There is a setting on the Shared Device that will cause all print queues that are matched to the device to automatically change their ports to use local LPR. This is recommended for sites that are not using print servers and each PC has a local print queue and PDAgent installed.
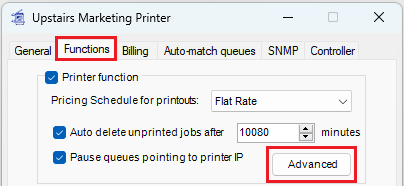
Navigate to the Functions tab of the Shared Device and click the Advanced button:
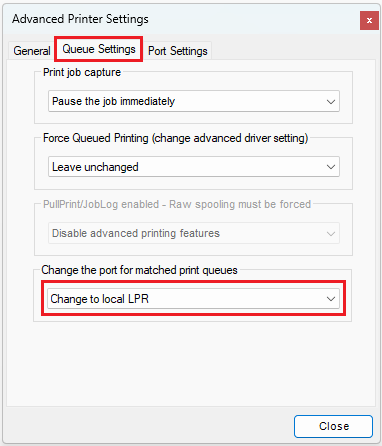
In the Advanced settings form, click the Queue Settings tab and change the bottom drop down to Change to local LPR:
Now click Close and then OK + Refresh All.
All print queues that have the Alter port setting on Use matched device setting (the default) will have their ports changed to local LPR.
Recommended setting for print servers
We could use the above method to auto-change the ports to local LPR, or we could do it on a queue by queue basis. Most importantly though, we want to create more than one LPR port for a queue on a server that is used by many users. This is because of the way the Windows spooler sends jobs through the port. If a client with a very slow network connection starts spooling a job to the server, the Windows spooler will immediately start sending it through the port and jobs that arrive after it will wait while the first job is finished using the port. The PDAgent will be unaware of these subsequent jobs because it is no longer watching the queue. It simply listens for data on the LPR port. Therefore it’s a good idea to add a pool of ports to the same queue. This way if a slow client is spooling through one port, the Windows spooler will send subsequent jobs through the next available port.
Open the print queue (Print Management > Shared Devices > Print Queues) and under the Windows queue set the Alter port drop down to Change to local LPR (assuming the shared device isn’t already set to alter matched queues to local LPR as in the example above). Now specify more than one pool port. In the example below we specify 5 ports. If the server is serving thousands of users, you could specify 10 or 20 pool ports:

Now click OK + Refresh. You’ll notice the queue will become un-paused, and any jobs waiting there would disappear. They will still be available for release though. You’ll be able to see them by opening the PDServer list of subscribed jobs, or the PDAgent list of waiting jobs.
Recommended config setting for Konica Minolta drivers
For Konica Minolta drivers, we recommend changing printer property setting. Without changing this setting, the user may notice a delay when printing from certain applications. It might appear that the application has frozen for a few seconds after they complete the print workflow. On Konica Minolta drivers, this happens because the driver is attempting to do a status check of the physical printer using the port information to connect. It will do this even if the Auto obtain settings is disabled.
To remedy this problem, open the Printer Properties for the queue, click the Configure tab and click the Obtain Settings button.

In the Obtain Settings form, untick the Auto checkbox. Choose the Specify IP Address or Printer Name option. Then enter the IP of the printer in the box. This can be the IP address of any printer that is online most of the time.

Now click OK and OK again to close the Printer Properties.
|
Document revision date: 2024/07/29 |
