Lexmark Integrated Setup Guide
Supported devices
The supported Lexmark devices can be found in the Print Director Lexmark Embedded Licence Structure document.
Features of the Print Director TM LeSF application
- Full print, copy, scan and fax tracking.
- Billing to third-party account codes / client numbers / project numbers on the LCD panel.
- Account credit limit enforcement.
- Integrated print tracking. Tracking of printouts is performed by the embedded application as opposed to data stream interpretation ensuring 100% accuracy.
- Secure Document Release: Print jobs can be released at any printer no matter which printer they were originally sent to.
- Card reader support: Supports all card readers that have a keyboard wedge mode. The Omnikey 5427CK supports many 125 kHz and 13.5 MHz proximity access cards/tags.
- Device login via: card swipe, user pin or user select. Passwords can be enforced and validated against the PD database or Active Directory.
- Account/Matter and User search supported.
- Card number self-registration: Card numbers can be automatically assigned to a user at the printer after the username and password is validated against the PD database or Active Directory.
- Scan to own email: Once the users have been set up in the PD database, there is no need to add their email addresses to the address book of every Lexmark device. The Scan to Email function will default to the email address of the logged in user.
- Authenticated printing enforcement supported: Jobs sent to the printer that are not authorised by PDAgent will be deleted.
Pre-requisites
- The Print Director software installation is complete (min version 2.4.4.0).
- The licence file that has been applied to the PDDB2 database contains enough Embedded Controller licences.
- You have the IP address of the printer.
Create the device and push the embedded application from Resource Manager
Resource Manager can be used to push the embedded application to the Lexmark device.
- Open Resource Manager (Start > Programs > Print Director 2 > Resource Manager).
- In the tree view, navigate to Print Management > Shared Devices.
- If a definition for the printer in question has already been created, skip to the next step. Otherwise, follow these steps:
- In the right hand pane, click Add.
- Enter a descriptive name in the Device Name text box.
- Enter the IP address of the MFP in the Host or IP text box.
- Click the Ping button to ensure that the device is accessible over the network.
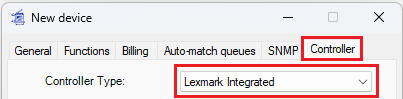
- Click the Controller tab.
- In the Controller Type drop down, choose Lexmark Integrated.
- All settings will be outlined in further detail below, but the most common setting to enable before Initialising the device is Secure Release. Click the Printing tab.
- Now click the Initialisation tab.
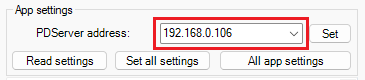
- In the App settings frame, ensure the correct PDServer’s IP appears in the PDServer address drop-down.
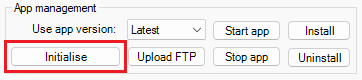
- If no other settings need to be altered (like username & password), then click the Initialise button in the App management frame to push the app and settings to the device.
- Take note of the output in the text box. If all is completed successfully, click the OK + Refresh All. If there are any problems, see the Troubleshooting section below.
Troubleshooting
“InternalServerError” when Initialising or Installing
This is normally caused by the device not supporting the version of the PDLexmark app to be installed. Try changing the Use app version in the App management frame.
“Unauthorised” message when performing API calls (e.g. Initialising)
This happens when the Public User does not have the Apps Configuration permission enabled under Access Controls > Device Management.
Credentials that will be used for all API requests must be entered for a user that has the Apps Configuration permission enabled.
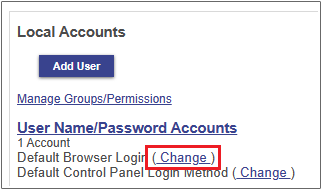
These must be the credentials of a local account of the same type that is specified by the Default Login Method for the Browser. To check the Default Login Method, open the printer’s web interface to go to Settings > Security > Local Accounts and click the Default Browser Login link:
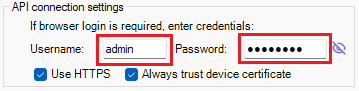
If the Default Login Method for the browser is User Name/Password, enter both the username and password in the API connection settings frame:
If the Default Login Method is PIN, enter the user’s PIN in the Password field and leave the Username field blank. Similarly, if the Default Login Method is Password, enter the password in the Password field and leave the Username field blank:

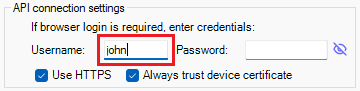
If the Default Login Method is just User Name, then enter the user name in the Username field and leave the Password field blank:
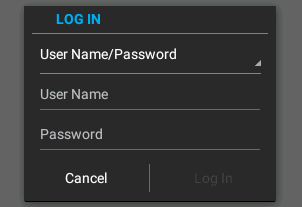
After Initialising, a non-PD Log In screen is displayed on the printer panel
If the printer has local user accounts, then it will show the screen below after installing the PD embedded app:
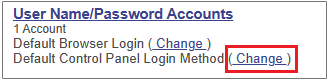
To fix this, open the printer’s web interface and follow these steps:
- Navigate to Settings > Security
- Click the Change link after the Default Control Panel Login Method label:
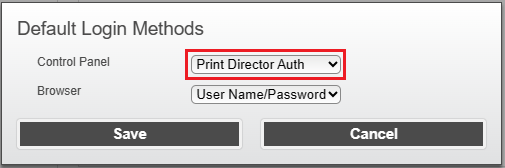
- Change the value in the Control Panel dropdown to Print Director Auth and click Save.
Controller configuration settings
The configuration settings for the embedded app can be accessed from the Shared device form, as well as the Lexmark Integrated list. The Lexmark Integrated list can be used to multi-edit more than one Lexmark setting at a time. Below is a description of the settings.
General tab

Show the Welcome screen (before login)
If this is ticked, a screen with a Login button will be displayed on the front panel. After this button is pressed, the authentication screen cycle will begin. This may be a card swipe, user select or user PIN screen. If this checkbox is disabled, then the first screen of the authentication cycle will be displayed (e.g. Please swipe card).
Show the User welcome screen (after login)
If this is ticked a screen will be displayed after this user has logged in, displaying their full name and the current balance of their account. If user credit limits are not enforced it is recommended to disable this screen.
Input screen timeout
Any screens that require user input (e.g. User PIN or Select Jobs for Release) will time out after the specified number of seconds.
Message screen timeout
Screens that show a message to the user (e.g. Num jobs released, User welcome screen) will time out after the specified number of seconds.
Panel search control behaviour
The user select, account select and matter select screens, have the ability to filter the objects displayed based on a search string. The Search method drop-down specifies that way in which objects are matched. They can either match objects using the starting letters (Starts with) or any letter contained (Contains).
The Search field drop-down specifies which fields to search in, when matching according to the search method above. It can either search using the Object ID (e.g. Controller User ID, Account Code, Matter Code) or the Object name (User Name, Account Name) or both.
Auto change Shared Device IP address
When the embedded app connects to the PDServer, it includes its IP address in the information submitted. If the Update user IP address received… checkbox is ticked, the Host or IP of the Shared Device will be updated with this IP address.
Remote panel
This link will open a web browser and attempt to connect to the Remote Panel of the printer.
Printing tab
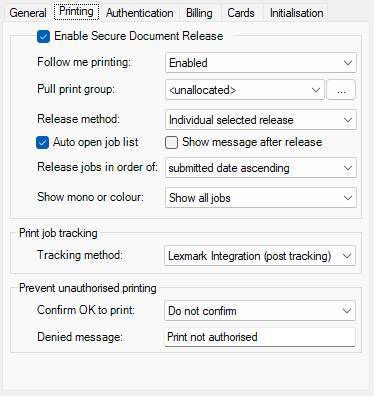
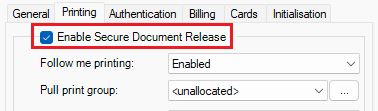
Enable Secure Document Release
Ticking this checkbox means that print jobs will wait at the print server (or workstation under direct-to-ip printing) until the user logs in to the Lexmark device and selects the jobs they would like to release.
Follow me printing
If enabled, jobs sent to any print queues that are matched to other devices with Follow me printing enabled can be released at any of these devices (as long as they are all members of the same Pull print group). If disabled, jobs can only be released at the device that is matched to the queue to which the job was originally sent.
Pull print group
If you would like to limit which devices jobs sent to specific queues can be released at, specify a Pull print group. Only jobs sent to queues matched to devices in the same Pull print group can be released at these devices. This is normally done if some devices use incompatible drivers.
Release method
The Release method drop-down specifies whether the user is shown a list of their jobs after they log in, or whether all of their jobs will be immediately released straight after log in.
Auto open job list
If a user has print jobs waiting to be released when they log in to the printer, the list of jobs will be shown immediately if Auto open job list is ticked. If it is not ticked, the user will need to touch Release Job on the printer panel to show the jobs available for release.
Release jobs in order of
Jobs can be displayed and released in a particular order depending on the option chosen in the Release jobs in order of drop-down.
Show mono or colour
If this printer is a mono printer, you could choose to show only mono jobs by choosing that option from the Show mono or colour drop-down. This would prevent the user from mistakenly releasing some of their colour jobs on a mono printer. If this is a colour printer, you could select Only show colour jobs to prevent users from releasing mono jobs at this printer which might have a higher cost per mono page than a dedicated mono printer.
Print job tracking
These options specify whether to track jobs using data-stream interpretation or whether to use reports sent by the embedded application to record print jobs.
Tracking via Lexmark Integration is almost always recommended. This is because it is more accurate than data-stream interpretation.
Prevent unauthorised printing
If the Confirm OK to print dropdown is set to Do not confirm, it means that print jobs sent to the device from sources other than the PDAgent will still be accepted and printed. It is recommended to change this to Only allow jobs from PDAgent. Now the printer will check the spool data for an authorisation token that will be sent to the PDServer for validation before processing the print job. If the data doesn’t contain a valid token, the job will be deleted.
There might be cases where the printer must allow jobs to print from other sources. For example, there may be an ERP system that sends jobs directly to the printer. If the system includes a username in the spool data, change the value to Allow if username authenticated. The username will be extracted and sent to the PDServer for validation. If successful, the job will be printed and recorded under that user.
However, the system might not format the username in a way that allows the printer to extract it and make it available to the embedded app for validation. In this case, the only option is to set it to Do not confirm and jobs will only be recorded if Record as user is set on the Authentication tab.
Authentication tab
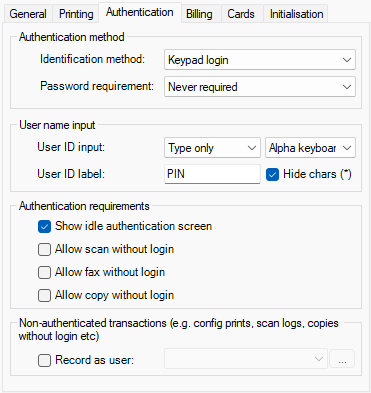
Authentication method
The Identification method drop-down specifies whether users must swipe their cards to login or whether they can login by entering their details or both. If the option is set to Card swipe or keypad login, the Card Swipe screen will be displayed with a Manual login button. If they touch the Manual login button, they will be able to login using their credentials. If the option is set to Card swipe only, the Manual login button is disabled. If the option is set to Keypad login only, then the Card Swipe screen is not displayed.
The Password requirement drop-down specifies whether to require a password after a card swipe or after entering a user PIN. By default it is set to Only with keypad login which means that if a card is swiped the user will be logged in without requiring a password. This can be changed to Never required or Always required.
User name input
Some sites like to keep the user name confidential. These sites would leave the User ID input method drop-down set to Type only. Other sites can change this to Type or select which will show a list of users so the user just needs to select their user name. They will also be able to search for their user ID or to manually enter it.
If the user ID is used more like a PIN than a user name, the characters can be hidden by asterisks by ticking the Hide characters (*) checkbox.
Authentication requirements
If the Show idle authentication screen checkbox is ticked, the login screen will always be displayed. This will allow the user to log in and perform prints, copies and/or scans without having to log in again. Once the user logs out, or the session times-out after 1 minute of inactivity, the login screen will reappear.
If it is not ticked, then the normal home screen is displayed. The login screen will only be displayed if the user opens a workflow (e.g. Copy) and the checkbox Allow copy without login is not ticked. Once they log in, they will be able to complete their photocopy, but if they subsequently would like to scan to email, it will require them to log in (unless Allow scan without login is ticked).
If any of the workflows are allowed without login, these transactions will be recorded under the user specified in the Record as user setting in the Non-authenticated transactions frame. If no Record as user is set, these transactions will not be recorded.
Non-authenticated transactions
These transactions include prints such as configuration pages printed from the device admin menus and scan or fax logs. They also include user initiated copies or scans which are allowed with requiring login (Allow copy without login or Allow scan without login checkboxes).
If the Record as user is not specified, these transactions will not be recorded.
Billing tab
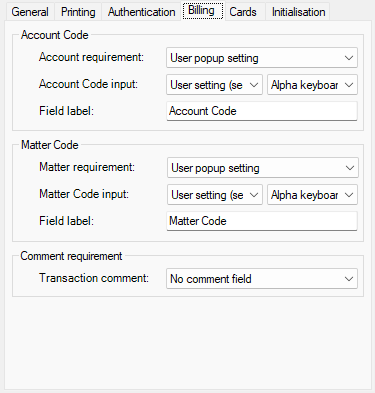
Account requirement
The default is to use the User popup setting. So if the user’s popup requirement is set to Require account code, they will need to enter an Account code when using the copy/scan/fax functions.
However, the per-user popup setting can be ignored by setting the Account Code requirement drop-down to No Account Code entry or Account Code required. The user popup setting will then only affect printing.
Account Code input method
You can specify how the touch-screen entry of the Account Code can be accomplished. The Account Code can be typed, selected or searched. You can also change whether a full alphanumeric keyboard is displayed or just a number keyboard (only to be used if all Account Codes are numeric).
Field label
It may be helpful to change the Field label to something more meaningful to the users. If the site bills jobs to Projects then enter Project in the Field label textbox. On the printer panel it will now request a “Project” instead of an Account.
Matter Code
These settings have the same meaning as those in the Account Code frame.
Comment requirement
Users can enter ‘comments’ for transactions. The comments will be displayed in ‘detailed’ reports.
If enabled, the Comment screen will be displayed when the user starts a workflow (e.g. Copy). They will need to enter a comment before seeing the normal Copy workflow.
Cards tab
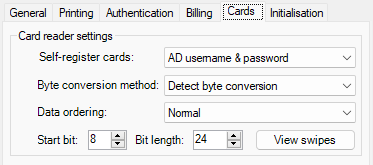
Self-register cards
One of the most labour intensive parts of the software implementation is the assigning of card numbers to users. An efficient way of doing it is for the users to assign their cards to themselves when they first use the device. If the network uses Active Directory, the users can be authenticated on the domain and then the card that they swiped will be assigned to their record.
Card reader settings
In order to determine the correct card settings, swipe a card at the device. This swipe will be recorded. Click the View swipes button to show all the swipes made at the device.
Use this form to determine the settings required for interpreting the correct card number. If you know what the card number should be (either printed on the card or retrieved from an access control system) you can set the byte ordering and bit positions so the same number is extracted.
Initialisation tab
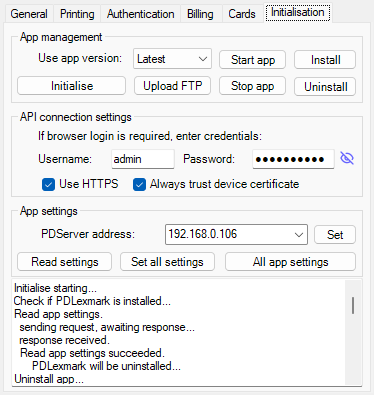
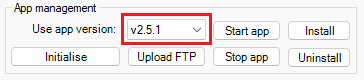
App management
- Use app version: If the device is an older model, like a XM3150, the app version will need to be changed. See Lexmark embedded licence structure to see which versions support which models.
- Start app button: If the app is not running on the device, it will be started.
- Install button: The app will be installed and started. This will not send the configuration settings.
- Initialise button: This will install the app and send the settings to the device. The app should be fully functional after initialisation.
- Upload FTP button: This will send the app to the device using FTP. This should only be used if the device has older firmware that doesn’t support web service calls.
- Stop app button: If the app is running, it will be stopped.
- Uninstall button: The app will be uninstalled.
API connection settings
If the Public user does not have the Apps Configuration access control enabled, then credentials for a user that does have Apps Configuration enabled will need to be specified. See “Unauthorised” message when performing API calls troubleshooting section for details.
- Use HTTPS: This should be ticked unless HTTPS has been disabled on the printer.
- Always trust device certificate: New printers come with their own self-signed certificates. This means certificate verification must be disabled in order to connect. If the device certificate has been replaced with a certificate from a trusted Certificate Authority, then this can be unticked and the certificate will be verified.
App settings
- PDServer address: This is the address that the printer will use to connect to the PDServer. It can send the server’s IP address or the host name to the printer. If using a host name, ensure the printer’s DNS settings are correctly configured. If the Set button is clicked, only this setting is sent to the printer.
- Read settings button: This will pull the current settings from the printer and they will be displayed in the text output box below.
- Set all settings button: This will send all the settings to the printer.
- All app settings button: This will show a form where all the other settings (apart from PDServer address and port) can be set.
App settings form
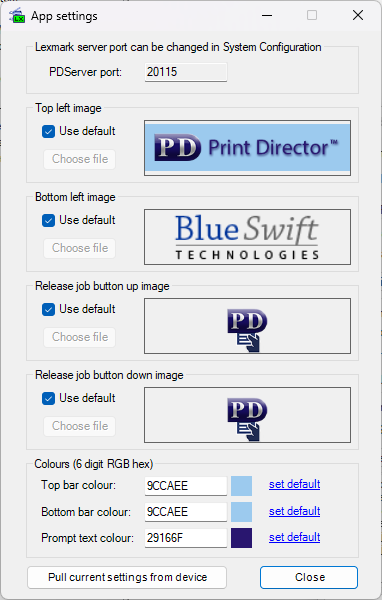
- PDServer port: This can only be changed in the System Configuration. In the menu bar of Resource Manager, click Tools > System Configuration > Networking. In the PDServer listening ports for controllers frame, the value for Lexmark can be changed.
- Top left image: This is the image that will be displayed in the top left of the printer panel. Untick the Use default checkbox and click the Choose file Supported formats are gif, jpg and png. Recommended size is 70 pixels for the height and between 70 and 350 pixels for the width.
- Bottom left image: Displayed in the bottom left of the printer panel. Recommended size is 70 pixels for the height and between 70 and 100 pixels for the width.
- Release job button up image: This is the image displayed on the Release Job button on the home screen. The up image is shown when not touched and the down image is shown when touched. Recommended size is 80 by 80 pixels.
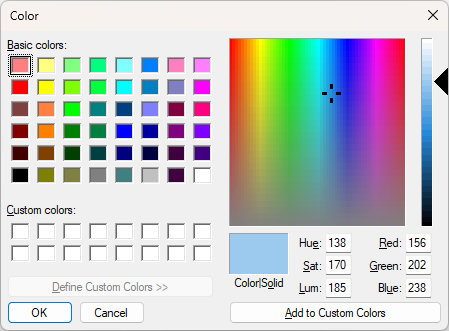
- Colours: These are the background colours shown on the printer panel. Click the colour box to open a colour picker form:
- Pull current settings from device button: This will pull the settings that are currently stored on the device and update the values in the form.
Appendix A: Card Self-Registration with Active Directory Authentication
Ensure that User self-registration of cards is enabled in the Controller Settings and then follow these steps.
Create LDAP Connection in System Configuration
- Open Resource Manager.
- In the menu bar, choose Tools > System Configuration.
- On the LDAP Authentication tab, click Add.
- Enter the Domain address and other LDAP connection details.
- Click Test Authentication to ensure the settings are valid.
- When LDAP authentication is attempted, it will use the first connection in the list of connections. If that fails, it will attempt the next connection. Certain usernames may only be valid on certain domains. To speed up the authentication process, a Regular expression can be added to the LDAP connection settings that can change the order in which connections are attempted based on the username.
Ensure the PDServer is running under a Domain Account
- Open the Service Manager (Task Manager > Services > Open Services)
- In the right panel double click PDServer.
- Click the Log On tab.
- Change the Log on as option to This account: and enter a domain username and password.
- Click Ok.
- Restart the PDServer service.
- NB: Ensure this domain account has local Admin rights.
Appendix B: Installing via the printer web interface
The embedded app can be installed using the printer’s web interface. This might be necessary for the following reasons:
- The printer’s firmware is too old to support web service communication.
- There is no access to Resource Manager.
When installing via the web interface, the ‘Shared Device’ will automatically be created in Print Director. Here are the steps to do this:
- Open a web browser. In the Address Bar, enter the IP of the device (e.g. http://192.168.10.10).
- In the left menu option list, click Apps.
- Click the Install an app If this button doesn’t appear, you might need to log in with user credentials that have the App Management access control enabled.
- Click the Browse button and navigate to where the PDLexmark.fls file is saved.
- Click the Install button.
- Once the installation process is complete, click the Return button.
- In the list of eSF applications, click the Print Director Lexmark Integration link.
- Click the Configure button.
- In the Primary Server address textbox, enter the IP address of the server running PDServer. Leave the port on 20115 (unless this has been changed in the System Configuration).
- Click Apply.
Appendix C: Changing the logout timeout
Once a user has logged in to the MFP, they have a certain amount of time to select a function to perform before a timeout occurs and they have to log in again. A shorter timeout helps prevent other users from using device functions after another user has logged in and then walked away from the printer without logging out (by pressing the home button). The default on a new Lexmark device is 60 seconds. Here are the steps to change it:
- Open a web browser. In the Address Bar, enter the IP of the device (e.g. http://192.168.10.10).
- In the left menu option list, click Settings.
- Click Device.
- Expand Preferences.
- Change the value in the Screen Timeout textbox.
- Click Save.
|
Document revision date: 2024/08/06
Software version: 2.4.12.4
