How to automatically email a comma separated file containing users
Exporting a user list is a scheduled task that is executed by the PDServer. Before configuring a Flat File Export, ensure that you have set up an Email Account.
Create a Flat File Export
- Open Resource Manager.
- Navigate to Scheduled Tasks > Flat File Exports.
- In the right hand pane, click Add.
- Enter a descriptive name for the Flat File Export in the Flat File Export name textbox.
- Choose the PDServer on which the scheduled task will execute from the Execute on PDServer dropdown.
- In the Destination frame, choose the Email option.
- Choose the Email Account that will be used to send the emails from the Account dropdown.
- In the To… textbox, enter the email address to which the Flat File Export will be sent (enter multiple recipients separated by a ;).
- Enter a Cc and Bcc if required.
- Enter a subject for the email. Make use of the run-time auto-replace tags. These tags will be replaced with run-time information such as the ‘Run’ date or the Flat File Export name. Place the cursor at the position in the text box where the tag should appear and then click the button representing the tag.
- Enter a message for the email. The auto-replace tags can also be used here.
- Click Next.
- In the Schedule Range frame, choose the Start date (normally it is left as the default – today). The scheduled task will begin execution on the start date if it adheres to the Schedule Pattern.
- Choose the Execute time. This is the time of day the report will be executed on the days governed by the Schedule Pattern.
- In the Schedule Pattern frame, choose whether the Report Export will be emailed Hourly, Daily, Weekly, Monthly or Annually. Enter the relevant parameters in the frame to the right.
- Click Next.
- Choose Users Export.
- Click Next.
- On the Options tab, choose the delimiter. In this example, we will be using Comma. The delimiter is the character that is used to separate each line of data into columns.
- In the Layout frame, tick the Export column headers as first row checkbox and choose the Text qualifier (leave as double inverted commas).
- In the Fields to be exported, tick all the fields you would like in your report. You can move the headings up or down by selecting the heading and clicking on the Move Up or Move Down buttons.
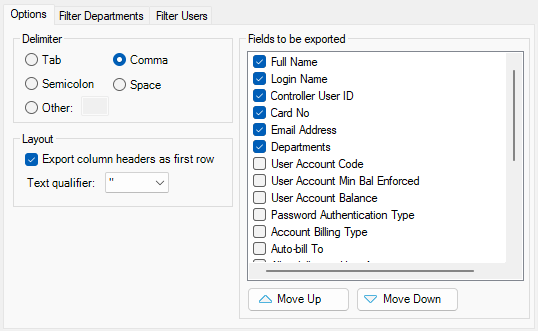
- If you would like only a subset of users exported, click on the Filter Departments tab.
- Tick the Filter departments checkbox.
- Tick the departments containing the users you would like exported.
- Click Finish.
Test the Flat File Export email by forcing it to execute now
Instead of waiting for the first execution according to the schedule, we can force it to execute now in order to confirm that all our settings are correct.
- Navigate to Scheduled Tasks > Flat File Exports.
- Right click on the newly created Flat File Export on the right and choose Execute now.
- The window that opens will ask if you want to set a “date to” date other than the current date & time. This is not relevant for the users export so just click OK.
- Now that we have specified that this Flat File Export must execute on the next refresh of the PDServer, we must refresh the PDServer. Click the PD Servers node on the left.
- Right click the PDServer on which the Flat File Export is set to execute and choose Refresh.
- Wait a minute or two, then go back to Scheduled Tasks > Flat File Exports. Check the Last Run If it shows a date that occurred in the last few minutes then we know it executed successfully.
|
Document revision date: 2024/07/10 |
