Installation Guide
Installing Software
Determine the site requirements
Ensure compatible networking & operating system infrastructure exists
Print Director tracks Windows print servers on a network. WAN networks are supported and the software can operate in Offline Mode (i.e. if the connection to the central database is lost, they will cache transactions locally).
Currently Unix, Linux and Macintosh print servers are not supported. However, printouts from client machines using these OS’s to Windows print servers will be tracked. Note the minimum requirements in Technical Requirements.
Check for an existing database server
The Print Director database is supported on Microsoft SQL Server 2008 – 2022 on both full and Express editions. Some sites may have an existing SQL Server that is used for other applications. It may be more beneficial to create the database on this server since it may be optimised for database services and have backup procedures already in place. Enquire with the system administrator whether the PD database may be installed on this server and ensure you will have sufficient access rights to create the database on this instance.
If there is no existing SQL Server, a machine must be allocated for an SQL Express installation. This could be the primary print server or any other machine.
Confirm device compatibility for embedded applications
Submit the device models to the reseller for confirmation of support by the embedded applications.
See Konica Minolta supported devices list.
See Lexmark supported devices list.
Identify the tracking requirements
Knowing exactly what the site needs to track is key to a successful implementation. Identify what types of print servers exist on site:
- Spooled print servers: A print server that has a number of shared printers set up. Clients then connect to these printer shares to print.
- Desktop print servers: Workstations that have a desktop inkjet or laser printer connected to the LPT or USB port.
- Direct-to-IP printing: Workstations that print directly to network connected printers.
Identify machines requiring software installation
PDServer:
Normally only one PDServer is required on a network. This is the module that communicates with the embedded software on the printers, and executes scheduled tasks (e.g. report emails and Active Directory or Azure AD synchronisation).
There are cases however, where more than one PDServer is required. An example would be a client that has multiple sites connecting to a central database over a WAN. It would be advisable to install a PDServer at each site. If the WAN were to go down, users would still be able to log in to the printers, as the local PDServer would continue operating in ‘offline mode’.
PDAgent:
All print servers (spooled, desktop and direct IP workstations) will require the PDAgent software module. Client workstations that print to a print server will not need the PDAgent unless:
- They have any local direct-to-IP or USB print queues.
- They will perform popup account billing.
- They require popup user authentication.
- They require popup Rule violation notifications.
These machines must meet the minimum requirements (see Technical Requirements). A reboot is not required, and the installation can be pushed via Group Policy or a similar deployment system (e.g. Microsoft Intune).
Resource Manager:
Administrators that conduct tasks such as altering printout pricing and adding users and accounts will require the Resource Manager module. Ensure that their workstations meet the minimum requirements (see Technical Requirements). No reboot is required.
PDReports:
Administrators that generate ad-hoc reports require the PDReports module. Confirm that these machines adhere to the minimum requirements (see Technical Requirements). No reboot is required.
Determine the most efficient deployment strategy
If a site only requires a few software modules to be installed, it would most likely be more efficient to manually install at each machine. An example of such a site would be one with a few print servers and users that do not require the popup client.
Sites that require many software modules to be installed may need to make use of a remote deployment strategy. Remote deployment is possible in sites that require all machines and users to log on to an Active Directory or Azure AD domain. Group Policy objects can be configured in the Active Directory that governs the deployment of packages to specific machines. An example of such a site would be one with many workstations that all print directly to the IP of the printers. The PDAgent module can be remotely deployed to all these workstations. Another example is a site with all their users making use of popup account billing (to perform third-party account billing).
Firewall issues
The system administrator would need to be informed of the port requirements for Print Director. See Technical Requirements for details. Note that if Windows Firewall is used, the PDAgent modules automatically create an exception for themselves.
Preparing the site for implementation
Ensure that all of the following steps are performed in advance of the scheduled implementation (e.g. 1 week). This is especially relevant at sites that will use remote deployment (Group Policy / Intune).
Obtain access rights to relevant machines
- Database machine: If SQL Express is to be installed (i.e. the site does not already have an SQL Server), obtain an administrative username and password for the database machine.
- Manual deployment on each machine: Administrative access rights are required for the installation of all modules.
- Remote deployment via Active Directory: Sufficient access rights to edit Group Policy Objects will be required.
Prepare any firewalls for required ports
The PDAgent module will automatically add an exception for itself in Windows Firewall. When the client application for PDAgent starts up, Windows Firewall should display a window asking whether or not to unblock it.
If any third-party firewalls exist on site, they should be configured to open the required ports (see Technical Requirements for port numbers).
The installation of SQL Express should automatically add the required Windows Firewall exceptions if the Print Director installer is used. If SQL Express is installed using the Microsoft installer, a firewall exception must be added for the sqlsvr.exe and sqlbrowser.exe processes manually (as well as enabling TCP/IP in SQL Server Configuration Manager).
Installation procedure
Once the full Print Director installation media has been downloaded and extracted, execute PrintDirector.EXE from the folder. The first form will be the end-user licence agreement. Please read the agreement carefully and if accepted, tick the I accept the terms of the licence agreement checkbox and click Next.
The next form will allow you to choose which modules to install.
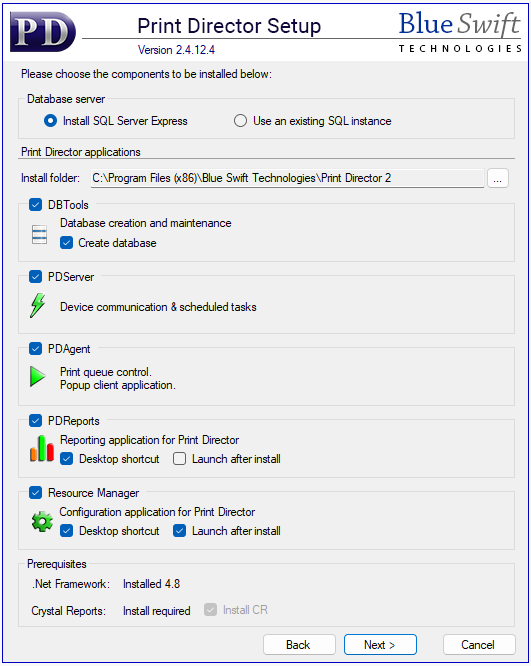
Install only the packages required for the local machine. If all packages are required, leave all the checkboxes selected.
SQL Server Express Installation
If the Install SQL Server Express option is selected, the installation settings form will be displayed after clicking Next.

Installer path:
This will default to the SQL 2017 Express installer that is normally included in the Print Director installation. However, if you would like to install a newer version SQL Express, you can change the path to the installer by clicking the ![]() button.
button.
Authentication:
Use a strong password that meets the policy requirements for the domain. If the password doesn’t meet the policy requirements, the installation will fail.
Please keep a record of this password.
SQL Server Instance Name:
If there is no existing default instance of SQL Server (check services.msc for SQL Server (MSSQLSERVER)) change the option to Default instance. Using the default instance means that the SQL Browser service is not required, and you don’t need to specify the instance name when entering database connection settings for other module installations.
Use the named instance ‘PD’ only if there is an existing default instance of SQL Server that we can’t use for the PD database.
Accept the default data paths unless the system administrator requires them to be changed and click Next.
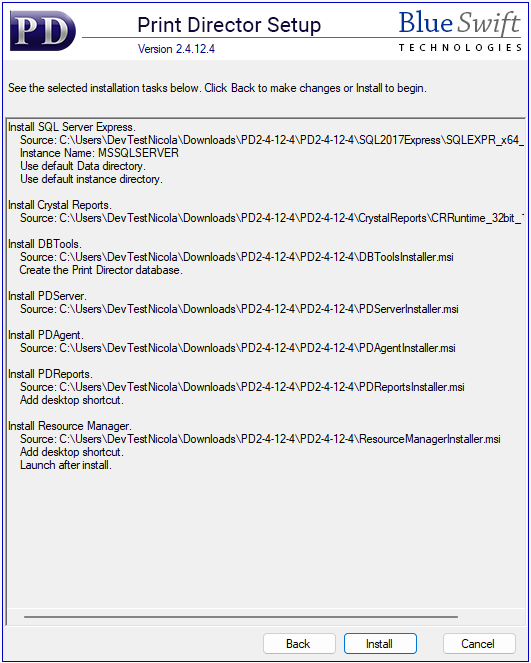
Check the summary of installation tasks. Click Back to make changes or Install to begin the installation.
Create the database
During the DBTools installation, you have the option to create the Print Director database by selecting the appropriate checkbox on the initial screen.

1. Specify the SQL Server:
- Enter the name of the SQL Server in the Server Name text box.
- If the server uses the default instance of SQL Server, the server name is the name as the hostname of the database machine.
- For the named instance, use the format MachineName\InstanceName (e.g., PDSERVER\PD).
- Ensure the Trusted Connection checkbox is selected unless the server is on a different machine and the current user does not have sufficient access rights.
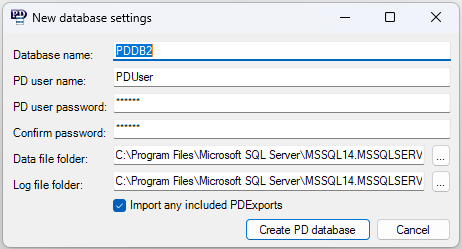
2. Configure Database Settings:
- The New Database Settings window will appear.
- Customize the database name and set the credentials for the limited SQL user that the PD modules will use to connect. This user will have the ‘public’ server role and ‘dbowner’ membership in the PD database.
- Click the Create PD Database button.
- Once the database is created, a licence file will be displayed.
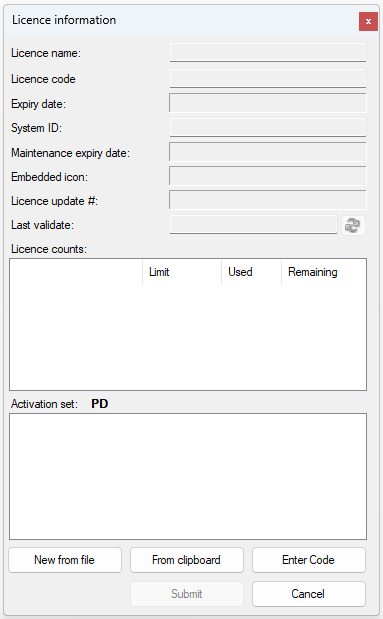
3. Apply the Licence:
- There are three methods to apply the licence, depending on your convenience:
- From a saved licence file:
- Click New from file and browse to the saved licence file (*.set).
- Using a licence code:
- Click Enter Code.
- Type in the 12-digit hexadecimal code provided by the reseller and click OK.
- Using encrypted text:
- Copy the encrypted text from the body of the licencing email to the clipboard.
- Click the From clipboard button.
- From a saved licence file:
4. Verify Licence Information:
- The licence information will be displayed.
- New licences usually have a System ID that does not match the SQL server hostname. To submit the licence, the System ID and hostname must match.
- New licences allow a one-time automatic update of the System ID to match the hostname. When you click Submit, a window will prompt you to confirm this change.

5. Complete Installation:
- If configured during the initial setup, the Resource Manager window will be displayed at the end of the installation.
Configuring the database connection on other machines
If modules are installed on machines other than the one where the database was created, you will need to configure the database settings. This configuration form will appear on startup of Resource Manager or PD Reports. For PDAgent installations, the form will be displayed after the installation wizard completes.
1. Specify the Server Name:
- Enter the name of the machine where the SQL Server is running.
- For a named instance, use the format MachineName\InstanceName (e.g., PDSERVER\PD).
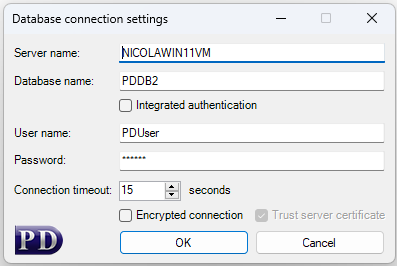
2. Default Credentials:
- The username PDUser and password PDUser are filled in by default.
- This user account is created with the Print Director database.
- Accept these default credentials unless instructed otherwise by your system administrator.
Remote deployment via Active Directory Group Policy
See document Group Policy Deployment of PDAgent.
|
Document revision date: 2024/07/30 |
