

How to set up IPPS on Konica Minolta printers
How to set up IPPS on Konica Minolta printers
This guide enables and confirms the device-side settings a Konica Minolta bizhub needs before Print Director can deliver print jobs to it over IPPS (IPP secured with TLS): the IPP service, the secure port and resource path, and the TLS versions. Once these are confirmed, configure Print Director itself by following How to deliver print jobs securely with IPPS, entering the port and path found here.
Konica Minolta bizhub devices support IPPS natively. On a device already hardened per How to harden the security of Konica Minolta printers, the certificate and TLS work is done: IPPS is served with the same device certificate and TLS version restrictions as the web interface, so IPPS delivery pairs naturally with that guide and lets you close the plaintext print ports it otherwise has to leave open.
Step 1: Enable IPP on the device
-
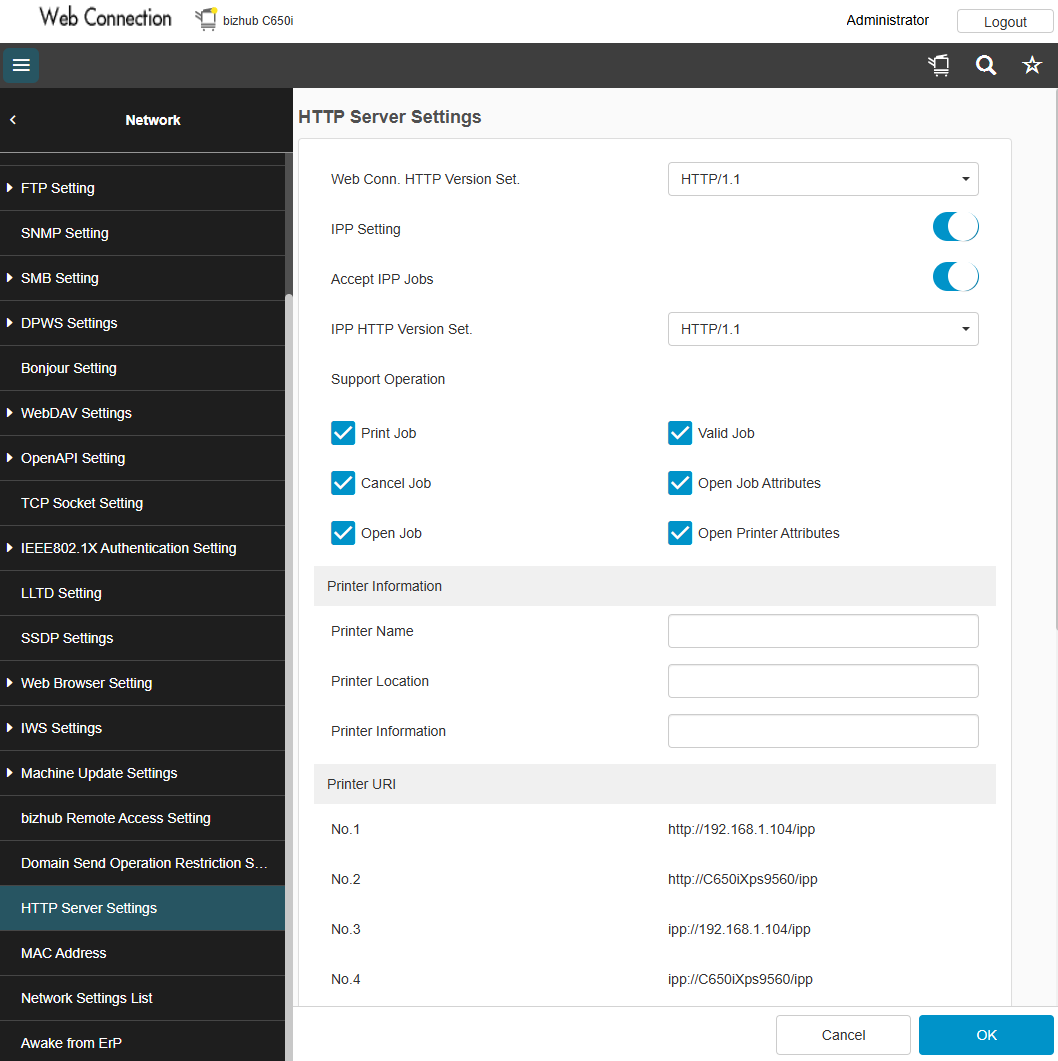
Log in to the printer’s web interface (Web Connection) as Administrator and go to Network > HTTP Server Settings.
-
Turn on IPP Setting and Accept IPP Jobs.
-
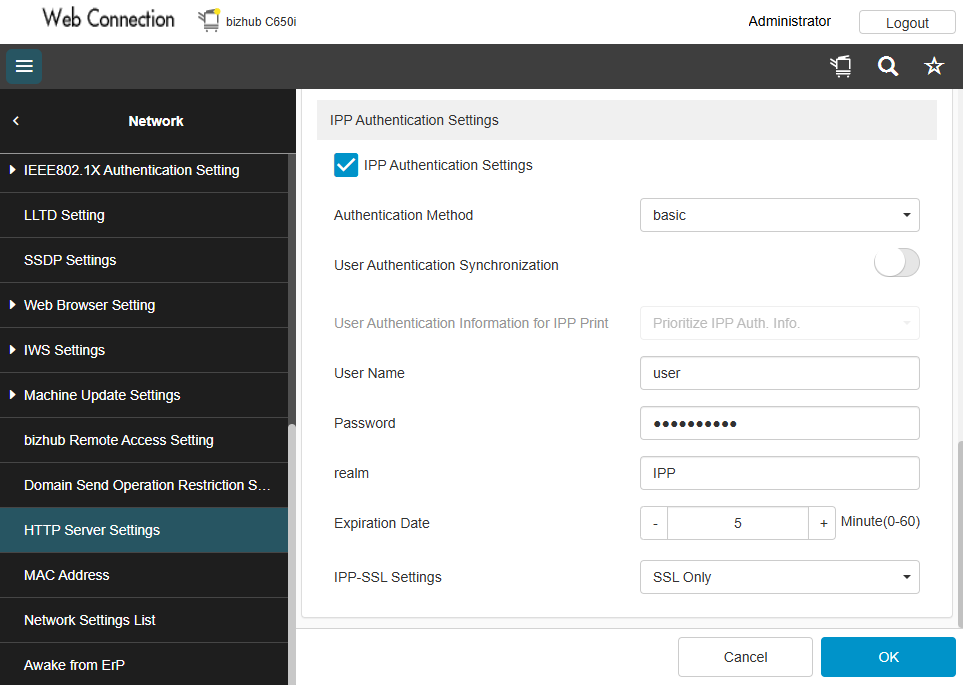
Scroll down to IPP-SSL Settings and select SSL Only to require encrypted IPP delivery, then save with OK. The screenshot also shows the optional authentication settings explained below.
Step 2: Confirm the port and path
On a bizhub, IPPS is served through the device’s HTTPS port, TCP 443, with the IPP resource path ipp. Plaintext IPP listens on TCP 631. As on other manufacturers, sending TLS to the plaintext port fails with a handshake error, so give Print Director the secure port, not 631.
So the values to enter in the shared device’s Network category in Resource Manager are port 443 with path ipp and Use TLS (IPPS) ticked. If delivery fails with “Nothing accepted the connection” or a handshake error, re-check the port against the device’s own network settings pages, since older firmware can differ.
Step 3: Confirm TLS 1.2 or 1.3 is enabled
Print Director negotiates whatever TLS versions the Windows server running the PDAgent supports, which on current Windows is TLS 1.2 and 1.3. If you followed the KM hardening guide, the device is already restricted to TLS 1.3 (or 1.2 as a fallback), which is exactly right. Check under Security > PKI Settings > Enable SSL Version that the SSL/TLS version range includes at least TLS 1.2.
Note that the device certificate configured in the hardening guide is the certificate IPPS presents. With Print Director’s recommended Pin certificate on first use trust policy any certificate works; with CA-signed certificates only, the device must hold a CA-issued certificate first.
Optional: Require authentication for IPP
To require a username and password as well as TLS, use the IPP Authentication Settings section on the same Network > HTTP Server Settings page:
- Enable IPP Authentication Settings.
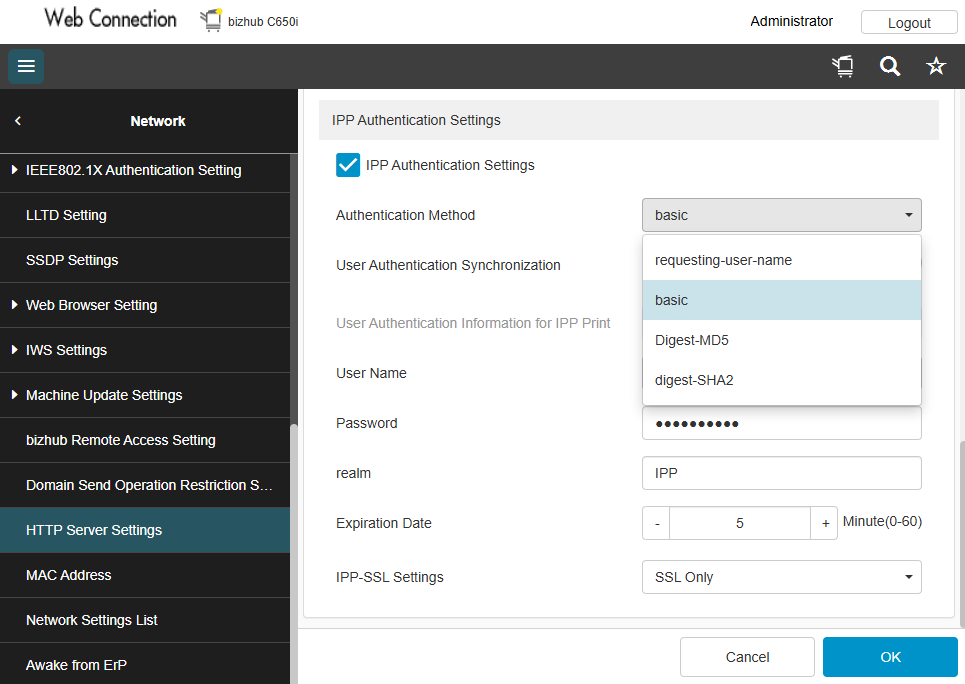
- Select basic as the Authentication Method for the setup described here.
- With User Authentication Synchronization off, enter the User Name and Password in this section, as shown above, then save with OK.
- Enter the same credentials in the shared device’s Network category in Resource Manager.
The C650i also offers requesting-user-name, Digest-MD5 and digest-SHA2. These are device options; their presence does not establish Print Director compatibility with every method. This guide uses HTTP Basic over the encrypted IPPS connection.
The general authentication flow is Step 4 of How to deliver print jobs securely with IPPS.
Related
- How to deliver print jobs securely with IPPS: the Print Director side, including the port settings, certificate trust policy and authentication.
- How to harden the security of Konica Minolta printers: SNMP v3, the device certificate and TLS restriction that IPPS delivery builds on.
| Document revision date: 2026/10/23 Software version: 2.5.15.3 |