

How to deliver print jobs securely with IPPS
How to deliver print jobs securely with IPPS
By default Print Director delivers a released print job to the printer over the raw print port (TCP 9100) or LPR (TCP 515). Both are unauthenticated and unencrypted, which is why printer-hardening advice normally has to say “leave the print ports open and restrict them with network ACLs”. If a vulnerability scan or a security policy requires those ports closed, that is a problem, because Print Director depends on them.
IPPS (the Internet Printing Protocol secured with TLS) is the encrypted alternative. When you switch a device to IPPS delivery, Print Director sends the job over a TLS connection to the printer’s IPP endpoint, optionally authenticating with a username and password, so you can close 9100 and 515 on that device. This guide configures IPPS delivery for one device, chooses a certificate trust policy, and optionally turns on printer authentication.
How Print Director delivers jobs to a printer
When a user releases a held job, the host holding the job opens a connection to the printer and sends the job to it. That host is the PDAgent responsible for the target device, or, from Print Director 2.5.14, the PDServer itself when the job is stored on the server. The delivery protocol is a per-device setting (and a separate one for a Fiery controller, if the device has one), and it applies whichever host does the sending:
- Raw (TCP 9100) and LPR (TCP 515) are the defaults. Fast, universally supported, and completely in the clear.
- IPP over TLS (IPPS) wraps the same job delivery in a TLS session. Print Director validates the printer’s certificate according to the trust policy you choose, authenticates if you have configured credentials, and only then sends the job.
Only the final hop to the printer changes. Secure release, user authentication, the embedded login application and job tracking are unaffected.
IPPS delivery starts after spooling finishes. IPP sends the job with a declared length, so Print Director waits for the job to finish spooling before it starts delivering, exactly as it does for LPR with byte counting. For a normal held job the user never notices, but a very large job arriving from a slow client (a CAD drawing, an image-heavy deck) does wait for the whole spool before the printer starts, where raw-port delivery and Lexmark Download print can start printing while the job is still spooling. If that matters for a device, weigh it against the encryption benefit, or use Download print on Lexmark, which is both encrypted and streams.
Before you begin
- Print Director 2.5.14 or later. Earlier versions do not offer IPP as a delivery protocol.
- Administrator access to the printer’s web interface and to Resource Manager.
- Confirm the printer exposes an IPPS endpoint, and on which port (Step 1). Most printers serve IPPS on a different port from plaintext IPP, and getting this wrong is the single most common setup mistake.
Step 1: Set up IPPS on the printer and find its port
This is the step people get wrong, so do it first and do not assume.
Plaintext IPP almost always listens on TCP 631. IPPS (IPP over TLS) is usually served somewhere else, most often on the device’s HTTPS port, TCP 443. If you point Print Director at TLS-on-631, the printer answers the TLS handshake in plaintext and delivery fails (see Troubleshooting).
Where the IPPS endpoint lives, whether it needs enabling, and which TLS versions the device offers are all manufacturer specifics, so they have their own guides. Follow the one for your device, then come back here with the port and path it gives you:
- How to set up IPPS on Lexmark printers: IPPS on 443 at path
ipp/print(631 is plaintext only). - How to set up IPPS on Konica Minolta printers: enabling IPP-SSL in Web Connection, IPPS on the device’s HTTPS port at path
ipp. - How to set up IPPS on HP printers: IPPS on 443 at path
ipp/print.
For any other manufacturer, check the device’s network or IPP settings page for the secure port and the IPP resource path. If the web interface does not state them, 443 with the path ipp/print is the right first thing to try, and 631 with TLS is almost always wrong.
Make sure TLS 1.2 or 1.3 is enabled on the device. Print Director negotiates whatever the Windows server doing the sending (PDServer or PDAgent) supports. Current Windows and current firmware both do TLS 1.2 and 1.3, so this is rarely an issue, but if the printer has been restricted to TLS 1.0/1.1 only, enable at least 1.2. The manufacturer guides above show where.
Step 2: Switch the device to IPPS delivery in Resource Manager
-
In Resource Manager go to Print Management > Shared Devices and open the device.
-
Select Network in the category list on the left.
-
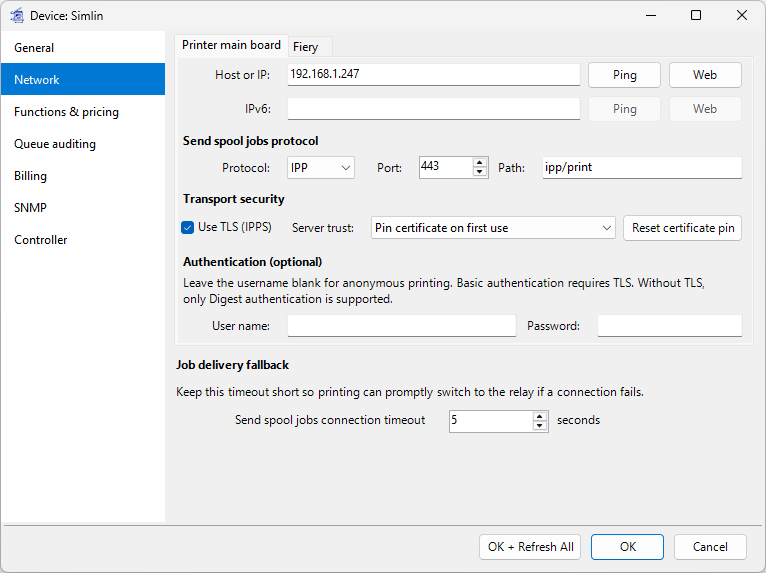
On the Printer main board tab, under Send spool jobs protocol, set Protocol to IPP and set:
- Port: the IPPS port from Step 1 (for example 443 on Lexmark).
- Path: the IPP resource path,
ipp/printby default. Enter it without a leading slash. - Use TLS (IPPS), under Transport security: ticked. This is what makes the connection IPPS rather than plaintext IPP. Leave it ticked unless you have a specific reason to send unencrypted IPP.
- Server trust: choose a policy (see below). Pin certificate on first use is the recommended default.
-
If the device also has a Fiery controller you deliver to, select the Fiery tab and configure its address and protocol.
-
Click OK to save the device.
To apply IPPS to several devices at once, select them together and open their settings. In Network, tick the checkbox beside each setting you want to change, starting with Protocol, then choose IPP and enter the values. Only the settings you tick are saved; each device keeps its own address. The Printer main board and Fiery tabs have their own checkboxes, as does the Send spool jobs connection timeout under Job delivery fallback. Switching categories keeps these selections.
In Print Director 2.5.14 this category is called Connections, and the protocol settings are under Printer connection. Earlier Resource Manager versions place them under Advanced > Port Settings.
Choosing a Server trust policy
The printer proves its identity with a TLS certificate, which on most printers is self-signed. The trust policy tells Print Director how strict to be about that certificate:
- Accept any certificate. The connection is encrypted but the printer’s identity is not checked. Simplest, but it does not protect against an attacker impersonating the printer, and a scanner may still flag it. Use only where identity does not matter.
- Pin certificate on first use (recommended). On the first successful job, Print Director records the printer’s certificate fingerprint and stores it against the device. Every later job checks that the printer still presents the same certificate, and fails if it changes. You get protection from the second job onward with no certificates to install. This is the sensible default for the self-signed certificates printers ship with.
- CA-signed certificates only. Print Director requires the printer’s certificate to be issued by a trusted certificate authority (either a public CA or your internal CA, which the Windows servers running the PDServer and PDAgents trust). The most secure option, but it only works if you have installed a CA-issued certificate on the printer first. Combine it with the certificate step in How to harden the security of Konica Minolta printers for a fully verified chain.
If a printer’s certificate is legitimately replaced (firmware reset, certificate renewal, mainboard swap) while the policy is Pin certificate on first use, delivery starts failing with a certificate-mismatch error. Open the device’s Network category and click Reset certificate pin, then save. The next job pins the new certificate.
Step 3: Send a test job and confirm
- Print a job to the device and release it as a user normally would.
- Confirm it prints.
- With Pin certificate on first use, Print Director records the printer’s certificate on that first successful job. A second job that also prints confirms the pin is in place and matching.
If delivery fails, the reason appears against the job in the Resource Manager waiting-jobs list (not only in the agent log), including the specific IPPS error. See Troubleshooting.
Step 4: (Optional) Require the printer to authenticate Print Director
TLS encrypts the job in transit, which is the main benefit and works with anonymous delivery. If you also want the printer to accept jobs only from Print Director, add authentication. Printers do not have a dedicated “IPP password” setting; IPP authentication uses the device’s normal account and permission system, so the job then runs on the printer as that account rather than as the anonymous or Public user. On Lexmark that is what allows the Public group to lose its print permissions entirely (see Lexmark print permissions for delivered jobs).
What the printer needs, whatever the manufacturer:
- An account the printer can validate with a username and password: a local device account, or a network account against LDAP or Active Directory if you would rather not keep credentials on the device.
- Permission for that account to print over IPP, and to print in black and white and colour. On most devices this is a function-access or role setting on the account’s group.
- The device’s HTTP login method must accept a username and password, since IPP authentication happens over HTTP Basic (or Digest) on the print connection. Some devices bind that to a separate “browser” or “web” login method that defaults to a PIN, and reject a username and password until it is changed.
- Anonymous IPP removed, so that unauthenticated requests are refused rather than accepted as the guest user.
The exact click paths are in the manufacturer guides: How to set up IPPS on Lexmark printers (including the Browser login method requirement that catches most people out), How to set up IPPS on Konica Minolta printers and How to set up IPPS on HP printers.
Then enter the credentials in Print Director. In the device’s Network category (Step 2 above), fill in User name and Password under Authentication (optional) on the Printer main board tab. Print Director sends them over the encrypted IPPS connection each time it delivers a job. Leave both blank to deliver anonymously.
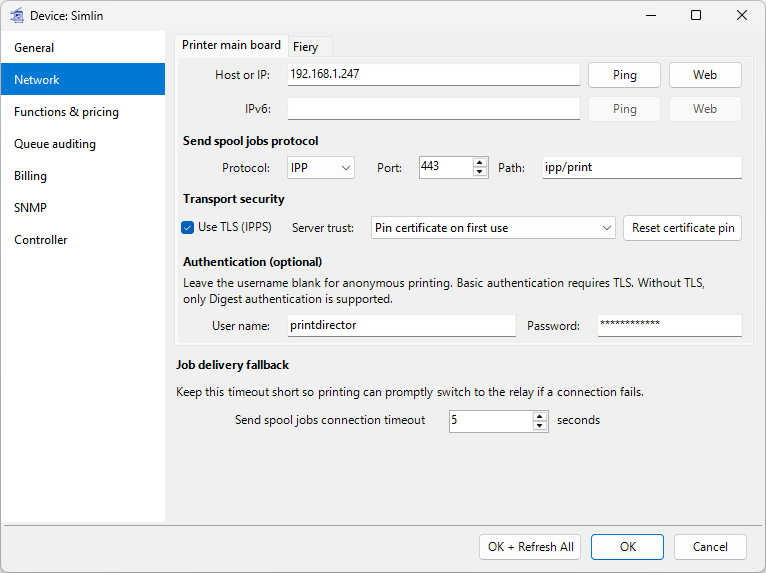
Basic or Digest, over the encrypted channel. Print Director answers whichever HTTP authentication scheme the device challenges for, Basic or Digest. Because IPPS already encrypts the channel, Basic is safe and is the most broadly compatible choice; Digest is supported for the common MD5 variant only, so a device that offers Digest-SHA-256 exclusively should be set to accept Basic. If delivery fails with an authentication error, the reason in the Resource Manager waiting-jobs list includes what the device asked for (for example
Basic realm="..."), which is the quickest way to see whether the credential was rejected.
Verify it worked
- Delivery: release a job and confirm it prints over the IPPS port.
- Encryption: the job now travels over TLS. You can confirm the printer is reached on the IPPS port rather than 9100/515 from the device’s own connection or job logs.
- Authentication (if configured): temporarily clear the password in Network and confirm delivery is refused, then restore it and confirm delivery succeeds.
- Close the plaintext ports. Once IPPS delivery is confirmed, you can restrict or close the raw print port (TCP 9100) and LPR (TCP 515) on the device, or block them at the network layer, without breaking Print Director. This is the hardening step IPPS delivery exists to enable.
Troubleshooting
“handshake failed due to an unexpected packet format” (error -30, SendFailure). Print Director sent a TLS handshake to a port that speaks plaintext, almost always plaintext IPP on 631 with Use TLS (IPPS) ticked. Set the port to the device’s real IPPS port (Step 1, usually 443), or untick Use TLS (IPPS) to send plaintext IPP on 631.
“TLS trust failure: certificate changed since it was pinned” (error -32). The printer is presenting a different certificate from the one pinned on first use. If the certificate was replaced on purpose, open Network and click Reset certificate pin, then save. If it was not, investigate why the printer’s identity changed before clearing the pin.
“IPP authentication failed (HTTP 401)” (error -31). The device rejected the credential. On Lexmark, the most common cause is that the Browser login method is still set to PIN, so the IPP endpoint will not validate a username and password over HTTP Basic even when that account signs in to the web interface fine (the tell-tale is username="guest" in the reported challenge). Set Default Browser Login to a username/password method, as described in How to set up IPPS on Lexmark printers. Otherwise re-check the credentials and that the account’s group has the IPP function access ticked.
Nothing accepted the connection on the port (error -30, ConnectFailure). Nothing is listening on the configured port. Check the port number and that IPP or IPPS is enabled in the device’s port-access list.
Every one of these appears against the job in the Resource Manager waiting-jobs list with the device name, the failed request, the port, and a hint, so you can usually diagnose without opening the agent log.
Related
- How to set up IPPS on Lexmark printers, How to set up IPPS on Konica Minolta printers, How to set up IPPS on HP printers: the device-side endpoint setup referenced in Step 1.
- How to harden the security of Konica Minolta printers and How to harden the security of Lexmark printers: device certificates, SNMP v3, TLS restriction and the network ACLs that pair with IPPS delivery.
- Lexmark print permissions for delivered jobs: why anonymous delivered jobs run under the Public user’s permissions, and how authenticated IPPS changes that.
- Could not create SSL TLS secure channel: older firmware TLS interop with Print Director.
| Document revision date: 2026/10/23 Software version: 2.5.15.3 |