

How to harden the security of Konica Minolta printers
How to harden the security of Konica Minolta printers
A multifunction printer ships configured for convenience, not security: SNMP v1/v2c with the default public community, a self-signed factory certificate, legacy TLS versions and a wide set of open services. This guide hardens a Konica Minolta bizhub device by moving it to SNMP v3 with authentication and encryption, restricting TLS, sorting out the device certificate and reducing the service footprint. It then reconfigures Print Director so meter readings keep working afterwards.
A welcome side effect is a clean (or cleaner) vulnerability scan. Scanners such as Nessus, Qualys and Microsoft Defender EASM routinely flag printers, and the critical findings are almost always the SNMP defaults, followed by medium findings against the web interface’s certificate and TLS configuration. Step 4 maps each common finding to its fix, and is honest about which ones an embedded web server cannot fully satisfy.
How Print Director uses SNMP on the device
Print Director reads page-count meters from the device over SNMP, on the schedule set per device in Resource Manager (hourly or daily). The device’s Request route setting controls which host takes the reading:
- PDServer then PDAgent (the default). The PDServer attempts the reading first. If it cannot reach the printer, which is common when the PDServer is hosted on a VPS with no inbound route to the print network, the request falls back to the PDAgents. They are tried in order of how close each PDAgent’s IP address is to the printer’s, until one succeeds.
- PDServer only and PDAgent only restrict the reading to one side.
Whichever host ends up taking the reading must be able to reach the printer on UDP port 161.
Print Director supports SNMP v1, v2c and v3 per device. Metering is the main SNMP consumer: secure release, the embedded login application and print tracking do not use SNMP. There is one exception. A PDAgent set to auto-create shared devices with an SNMP check required only creates the new device once an SNMP query to it succeeds. Auto-created devices copy their SNMP connection settings from the Default shared device entry, so on a v3-only fleet you should update the Default entry with the same v3 settings you configure below. Otherwise the check fails and auto-creation stalls.
Before you begin
- Administrator access to the printer’s web interface (Web Connection) and to Resource Manager.
- Update the printer firmware first. Several findings (available TLS versions, cipher suites, SHA-2 support for SNMP v3) improve or disappear on current firmware.
- Check what else polls the device over SNMP. Anything still using v1/v2c breaks when you disable those versions. Most commonly:
- Windows Standard TCP/IP printer ports with “SNMP Status Enabled” (on print servers and workstations with direct IP queues). These use a v1/v2c community name. Untick SNMP status on those ports, or update their community name if you keep v1/v2c enabled during a transition.
- Fleet or MPS monitoring tools, for example a dealer’s data-collection agent. These usually support v3; reconfigure them with the same credentials you create below.
- Choose the SNMP v3 values you will enter on both sides: a read-only user name, an authentication password and a privacy (encryption) password. Use two different strong values of at least 8 characters.
Step 1: Configure SNMP v3 on the printer
Log in to the printer’s web interface (Web Connection) as Administrator, then go to Network > SNMP Setting.
-
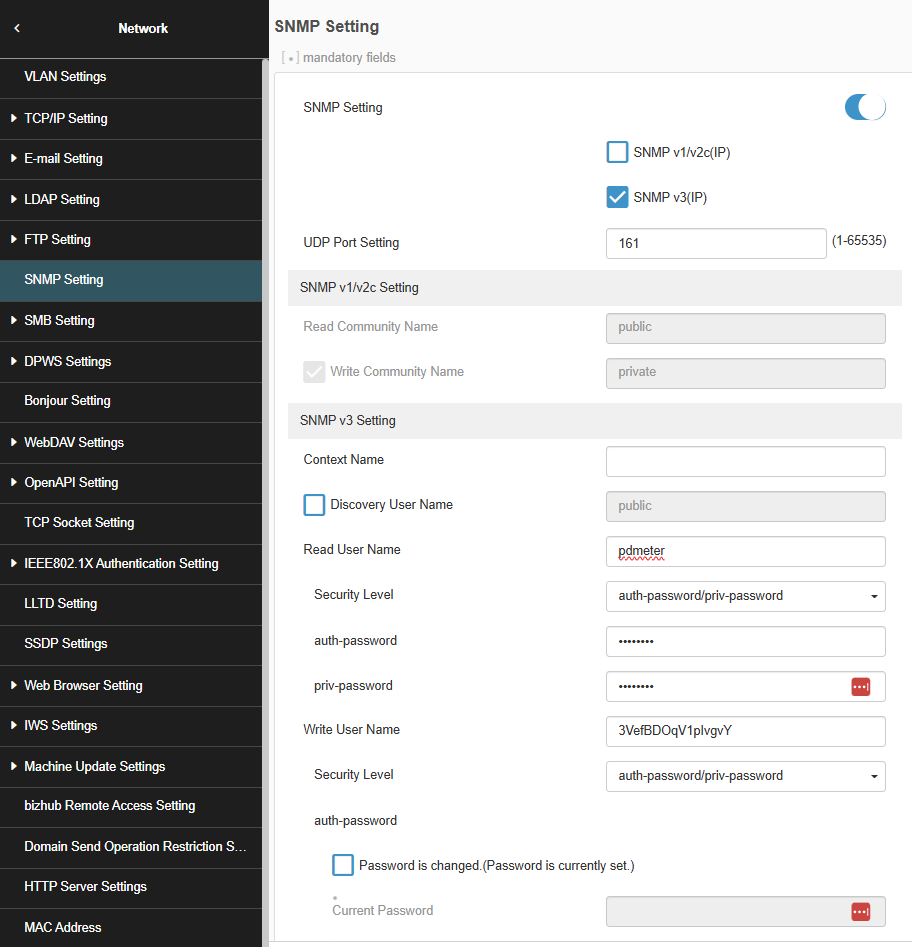
Leave the SNMP Setting toggle on, tick SNMP v3(IP) and untick SNMP v1/v2c(IP). Disabling v1/v2c is what clears both critical findings, and the SNMP v1/v2c Setting section (community names) greys out once it is off. If you must keep v1/v2c temporarily, for example for a port monitor you have not reconfigured yet, at minimum change the read community from
publicand the write community fromprivate. Plan to disable it though: scanners flag v1/v2c as end-of-life regardless of the community name. -
Leave UDP Port Setting at
161. -
Under SNMP v3 Setting:
- Context Name: leave blank. Resource Manager’s Context name must match, so also blank.
- Discovery User Name: leave unticked. Ticking it enables an anonymous discovery user (named
publicby default), so off is the hardened choice. - Read User Name: change the factory default
initialto your own read-only user, for examplepdmeter. Print Director authenticates as this user. - Security Level:
auth-password/priv-password, meaning authentication and encryption. - auth-password and priv-password: the two passphrases you chose. Resource Manager needs both.
- Write User Name: Print Director never writes over SNMP, so the write user (factory default
restrict) is unused. It stays active though, so set it toauth-password/priv-passwordwith its own strong passwords as well.
-
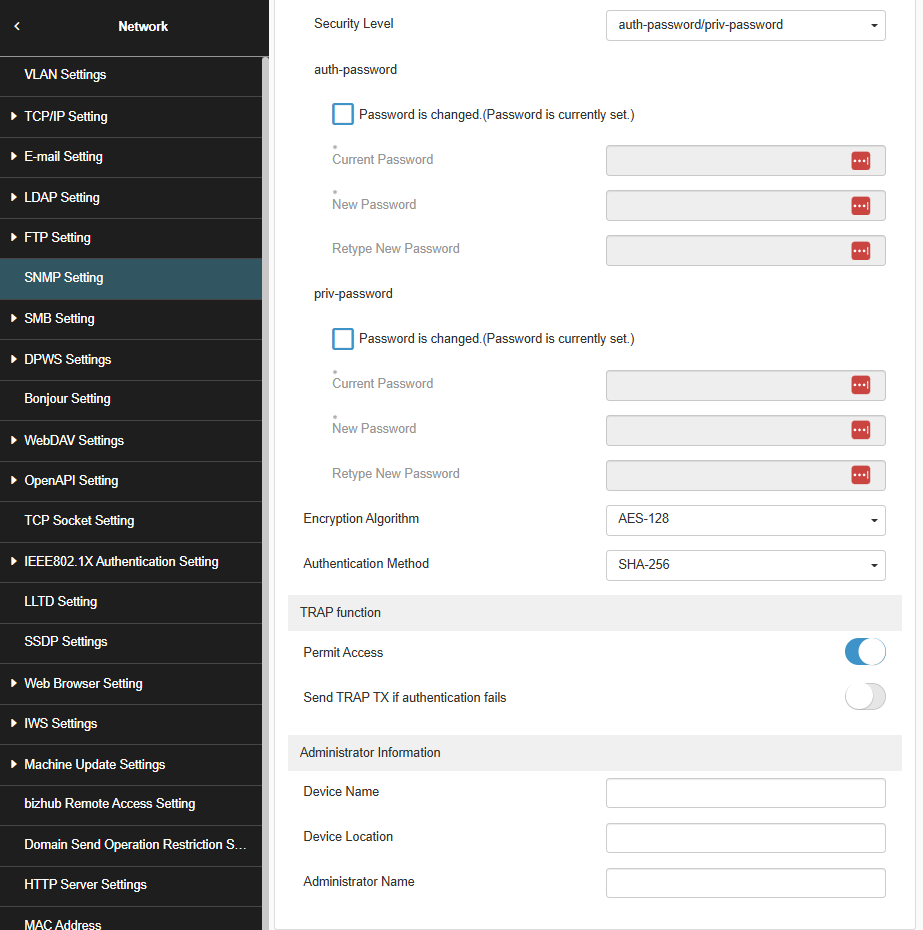
Scroll down to the algorithm settings below the write user. These apply to the v3 configuration, and Resource Manager must be set to match them exactly (Step 2):
- Encryption Algorithm:
AES-128. - Authentication Method:
SHA-256.
- Encryption Algorithm:
-
Click OK and let the device restart its network services if prompted.
Step 2: Update the device in Resource Manager
To give several devices the same SNMP v3 settings at once, select them together and open their settings. In the SNMP connection settings window, tick the checkbox beside each setting you change, including the one beside the v3 fields; settings you leave unticked keep each device’s own value.
-
In Resource Manager go to Print Management > Shared Devices and open the device.
-
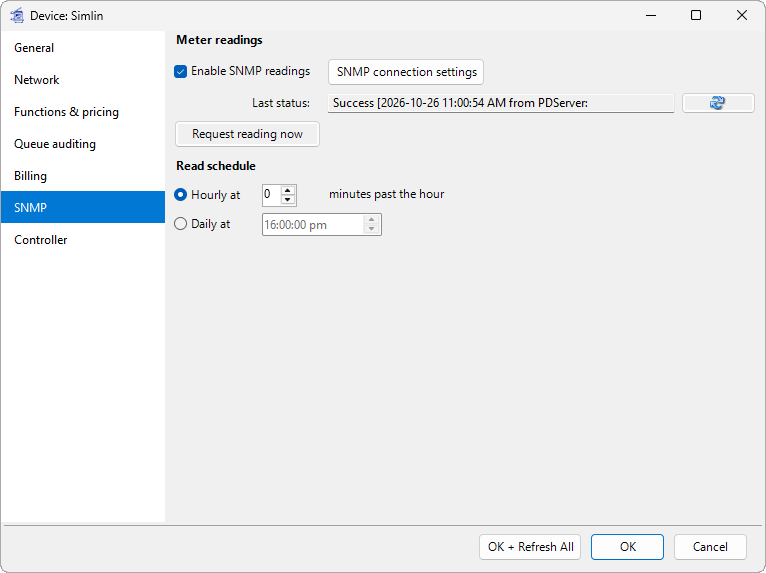
Select SNMP in the category list on the left, make sure Enable SNMP readings is ticked, then click SNMP connection settings.
-
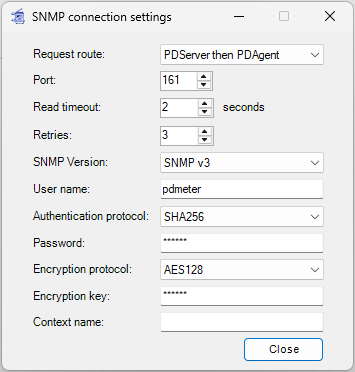
In the SNMP connection settings window, match the printer:
- Request route: leave as it was, usually PDServer then PDAgent (see How Print Director uses SNMP above). v3 does not change how the reading is routed.
- Port / Read timeout / Retries: leave at
161/2seconds /3. - SNMP Version: select SNMP v3. The Read community field changes to User name; enter the read user from Step 1 (for example
pdmeter). - Authentication protocol:
SHA256, matching the printer’s Authentication Method. Password: the printer’s auth-password. - Encryption protocol:
AES128, matching the printer’s Encryption Algorithm. Encryption key: the printer’s priv-password. - Context name: blank, matching the printer.
-
Click Close and save the device.
The password and encryption key are stored encrypted in the Print Director database. If you chose different algorithms on the printer, set the two protocol fields here to match; a mismatch shows up as an authentication failure in Step 3. Resource Manager offers MD5, SHA1, SHA256, SHA384 and SHA512 for authentication and DES, AES128, AES192 and AES256 for encryption, but you can only use what the printer’s SNMP page also offers.
Step 3: Verify meter readings still work
Still in the device’s SNMP category:
- Click Request reading now.
- Use the refresh button next to Last status to watch the result. A successful reading reports success with a timestamp. An authentication or privacy mismatch shows an SNMP error here; re-check that the user name, password, encryption key and context name match the printer, and that the Authentication protocol and Encryption protocol match the printer’s Authentication Method and Encryption Algorithm from Step 1.
- Confirm the new reading appears under Reports > Device meter readings (see How to open a device meter reading report).
Step 4: Harden TLS and the device certificate
The remaining hardening, and the rest of a typical scan report, concerns the printer’s web interface and other TLS services on the device, not Print Director. What is achievable depends on firmware, so treat this as: fix what the device allows, then formally accept what remains.
Order matters: install a modern certificate first, then enforce HTTPS. Enabling SSL/TLS mode makes the browser reload the admin session over https immediately. If the device is still presenting its factory certificate, Chrome and Edge may refuse the connection outright (weak key or legacy signature) and lock you out of Web Connection mid-change.
4a: Create a new device certificate
Go to Security > PKI Settings > Device Certificate Setting. Devices usually ship with a factory self-signed certificate. Leave it in place and click New Registration > Create and install a self-signed Certificate, then fill in:
-
Common Name: the name administrators actually browse to, which is the printer’s DNS name if it has one, otherwise its (static) IP address.
-
Organization / Unit / Locality: your organisation’s details, free text.
-
Validity period: a trade-off. A value of 398 days or less satisfies the certificate-lifetime rule scanners apply, at the cost of repeating this step annually. The maximum validity is set-and-forget, but the scanner will keep flagging the duration. Decide per your security policy.
-
Encryption Key Type: RSA-2048_SHA-256, scrolling past the RSA-1024 and MD5/SHA-1 entries. This is the setting that matters most: Chrome refuses RSA keys shorter than 2048 bits (
ERR_CERT_WEAK_KEY), and MD5/SHA-1 signatures are themselves scan findings.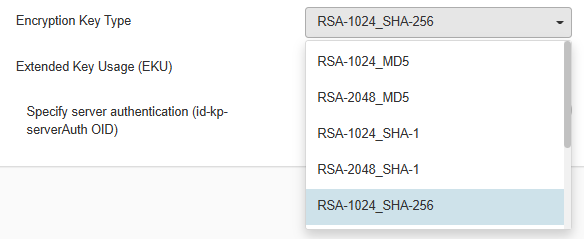
-
Extended Key Usage, “Specify server authentication (id-kp-serverAuth OID)”: tick it. This marks the certificate as a TLS server certificate, the extension that browsers and scanners expect on a web-server certificate.
Install the new certificate, then make it the Default. This is the step people most often miss. If the device holds more than one certificate and you leave the old one selected, the printer keeps serving the old certificate and the scan still flags it. In the certificate list, select the radio button in the Default column next to the certificate you just created, then click OK.
The page notes that a certificate marked * needs the main power switch cycled to be re-issued, so if prompted, restart the device before continuing.
A certificate issued by your internal CA (imported on the same page) is better still. It is the only way the scanner’s self-signed / not valid findings clear completely, because the scanner can then validate the chain.
4b: Enforce HTTPS and restrict TLS versions
Go to Security > PKI Settings > Enable SSL Version:
- Mode using SSL/TLS:
Admin. Mode and User Mode, so the whole web interface is served over HTTPS, not just the administrator pages. - Encryption Strength: shown here as
AES-256. This is a read-only indication, there is nothing to set. - SSL/TLS Version Setting: set both Minimum and Maximum to
TLSv1.3. TLS 1.3 is the strongest option and drops the legacy cipher suites the scanner flags. Lower the Minimum toTLSv1.2only if the Windows server running Print Director cannot negotiate TLS 1.3; older Windows versions sometimes lack TLS 1.3 or its cipher suites.
When you click OK the browser immediately reloads the session over https. With the RSA-2048/SHA-256 certificate from step 4a the browser shows the normal self-signed warning and lets you proceed, and shows no warning at all with a CA-issued certificate. This immediate reload is exactly why the certificate comes first: against a factory certificate the browser may refuse the connection entirely.
What this clears, and what remains
| Scanner finding | Remediation |
|---|---|
| Remote server supports TLS 1.0 / TLS 1.1 | Cleared by 4b (TLS 1.3 only). |
| SSL/TLS CBC mode ciphers (BEAST) | Cleared by 4b: TLS 1.3 uses only AEAD cipher suites, so there are no CBC-mode ciphers left to flag. |
| SSL certificate is self-signed / not valid | A CA-issued certificate (4a) clears it. A fresh self-signed RSA-2048/SHA-256 certificate keeps browsers working, but the scanner still flags self-signed, so record it as accepted risk. |
| SSL certificate invalid validity duration | Keep validity to 398 days or less when creating the certificate (4a). |
| SSL D(HE)at attack vulnerability | Caused by the device offering DHE key exchange in the legacy cipher suites. TLS 1.3 only (4b) removes those suites. If a scan still reports it against another service on the device, close that service at the network layer (below). |
| SSL configuration not compliant with old/intermediate compatibility recommendation | Policy-profile comparisons (Mozilla profiles), largely resolved by 4b. Full “intermediate” compliance is usually not reachable on embedded firmware. |
| Missing HTTP security headers | The embedded web server does not let you add response headers. Accepted risk. |
| Default SNMP community name / end-of-life SNMP | Cleared by Steps 1 and 2. |
Do not break Print Director while hardening TLS. Print Director initialises and reads current bizhub devices with the printer set to TLS 1.3 only. Set the Minimum to TLSv1.2 instead if the Windows server running Print Director cannot negotiate TLS 1.3 (older Windows versions sometimes lack TLS 1.3 or its cipher suites), or if a device is on very old firmware that does not offer it. See Could not create SSL TLS secure channel in the KMI troubleshooting section before changing SSL settings.
Reduce the attack surface generally. A printer’s embedded web server will never scan completely clean. The findings that cannot be remediated on-device are normally closed at the network layer: put printers on a dedicated VLAN and allow inbound access only from the print servers (PDServer and PDAgents) and the administrators’ subnet. In Web Connection, disable the services you do not use, such as FTP, Telnet, Bonjour, SSDP and WebDAV. But do not disable the print ports Print Director delivers on: by default that is the raw print port (TCP 9100) or LPR (TCP 515), so those must stay reachable from the print servers, restricted with network ACLs rather than disabled. From Print Director 2.5.14 there is a better option: switch delivery to IPPS (Step 5), after which the plaintext print ports can be closed entirely. Either way this addresses the scanner’s open-ports and internet-exposure observations.
Step 5: (Optional) Deliver jobs over IPPS and close the plaintext print ports
Everything above still leaves job delivery itself in the clear: released jobs travel to the printer unencrypted over the raw print port (TCP 9100) or LPR (TCP 515), which is why those ports have to stay open and ACL-restricted. From Print Director 2.5.14, delivery can instead go over IPPS (IPP secured with TLS) to the bizhub’s secure IPP endpoint. The job is then encrypted in transit, can optionally be authenticated, and the plaintext print ports can be closed on the device, removing them from the scan report instead of accepting them.
IPPS delivery also builds directly on this guide’s certificate work: the device certificate from Step 4a is the certificate the IPPS endpoint presents, and with a CA-issued certificate Print Director’s strictest CA-signed certificates only trust policy becomes available.
The full setup is in two companion guides:
- How to set up IPPS on Konica Minolta printers: enable the device’s IPP-SSL endpoint and confirm the secure port and path.
- How to deliver print jobs securely with IPPS: switch the device to IPPS delivery in Resource Manager, choose a certificate trust policy, optionally add authentication, and verify before closing 9100/515.
Verify it worked
- Meter readings: Request reading now succeeds and new readings appear in the device meter reading report.
- Printing and release: send a job, log in at the panel and release it, confirming the embedded app and job tracking are unaffected.
- Re-run the vulnerability scan against the device. The two critical SNMP findings and the TLS 1.0/1.1 findings should be gone. Certificate findings clear if you deployed a CA-issued certificate. Any remainder should now be small enough to record as accepted risk with the compensating network controls noted.
Related
- How to set up IPPS on Konica Minolta printers and How to deliver print jobs securely with IPPS: encrypt job delivery and close the plaintext print ports (Step 5).
- Chrome blocks access to printer web interface: certificate generation and TLS restriction on bizhub devices, step by step.
- Could not create SSL TLS secure channel: older firmware TLS interop with PDServer.
- How to open a device meter reading report: where the SNMP readings surface.
| Document revision date: 2026/10/23 Software version: 2.5.15.3 |