

How to harden the security of Lexmark printers
How to harden the security of Lexmark printers
A Lexmark printer ships configured for convenience, not security: the Embedded Web Server is open to anyone on the network with no administrator password, every menu and function is available to the anonymous Public group, and SNMP answers v1/v2c queries with the default public community. This guide hardens a Lexmark device in three moves: it locks administration behind an internal admin account and reduces Public to the minimum, moves SNMP to v3 with authentication and encryption, and switches Print Director’s job delivery to IPPS so the plaintext print ports can be closed. At each step it keeps Print Director’s meter readings and job delivery working.
As with the Konica Minolta guide, a welcome side effect is a cleaner vulnerability scan: open administration and SNMP defaults are the critical findings scanners raise against Lexmark devices, followed by findings against the web interface’s certificate and TLS configuration.
How the Public group and Print Director interact
On a Lexmark device the Public group is what an anonymous user gets, and its permissions are always inherited: a signed-in user’s effective rights are Public’s permissions plus whatever their own groups add. Three consequences shape the lockdown in Step 1:
- Nobody should be able to use the device without signing in to Print Director. That is the point of the product, so Public should hold no walk-up functions at all: no copy, no scan, no apps. Print Director replaces the native copy and scan workflows with its own, and when a user signs in, its login method re-grants the functions that user is allowed, including the known third-party apps on the device (Scan Center, Card Copy and Lexmark Cloud Connector all work after a Print Director sign-in with Public reduced to the minimum shown below). Only a third-party app Print Director does not know about needs to be ticked under Public’s Apps node.
- Print Director still enforces per page, whatever app is used. Every print and scan on the device passes through Print Director’s job check, which applies the user’s rules and account balance and blocks anything not authorised by a signed-in Print Director user. So a user who dismisses the Print Director login by tapping Home and tries Copy or Card Copy is stopped, even someone who signs in with the device’s own admin account, unless the device’s Print Director initialisation settings explicitly allow copying, scanning or faxing without a login.
- Delivered print jobs arrive as Public. A job Print Director delivers over the raw print port (TCP 9100) or LPR (TCP 515) carries no login, so the printer evaluates it against Public’s Function Access. Public therefore needs B/W Print and Color Print for as long as the device is delivered to that way. Once the device uses Download print or authenticated IPPS (Step 4), those two can go as well. The full explanation is in Lexmark print permissions for delivered jobs.
Before you begin
- Network access to the printer’s Embedded Web Server (browse to the printer’s IP address) and administrator access to Resource Manager.
- Update the printer firmware first. Newer firmware offers stronger SNMP v3 algorithms and TLS versions.
- Check what else polls the device over SNMP. Anything still using v1/v2c breaks when you disable those versions: Windows Standard TCP/IP ports with “SNMP Status Enabled”, and fleet or MPS monitoring tools. Reconfigure or plan for them, as covered in the KM guide’s Before you begin list, which applies unchanged here.
- Choose the values you will need: an admin account username and password (Step 1), and for SNMP v3 a read-only user name, an authentication password and a privacy (encryption) password (Step 2). Use strong, distinct values.
Step 1: Create an internal admin account and lock down the Public group
Out of the box, “logging in” to a Lexmark EWS means clicking straight into the menus: the Public group has everything, including the security menus themselves. The fix is to create a named administrator account, then remove administrative access from Public so the account is actually required, and finally take away Public’s walk-up functions.
Create the account first, and confirm it works before restricting Public. If you restrict Public first and the admin login has a typo, you can lock yourself out of the web interface.
1a: Create the admin account
-
In the Embedded Web Server go to Settings > Security > Login Methods.
-
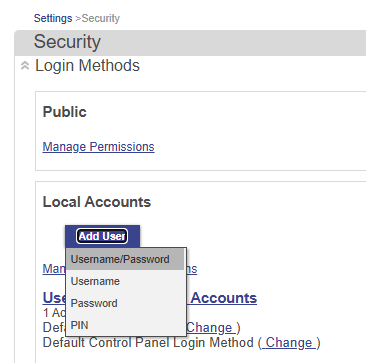
Under Local Accounts, click Add User and choose Username/Password.
-
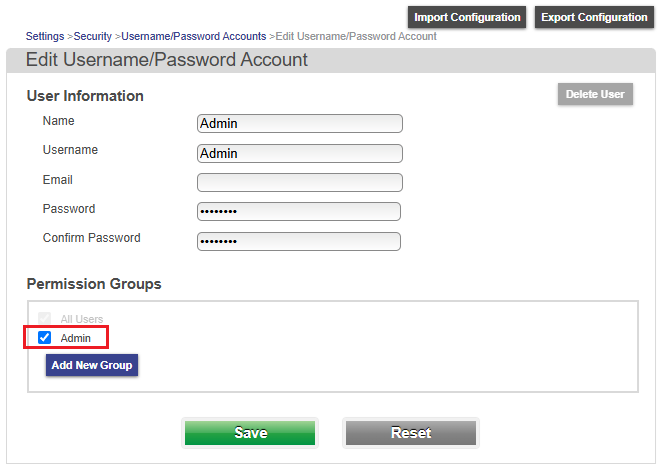
Fill in the name, username and password. Under Permission Groups, tick Admin (all accounts are in All Users automatically). If this device has no Admin group yet, click Add New Group to create one. Save.
-
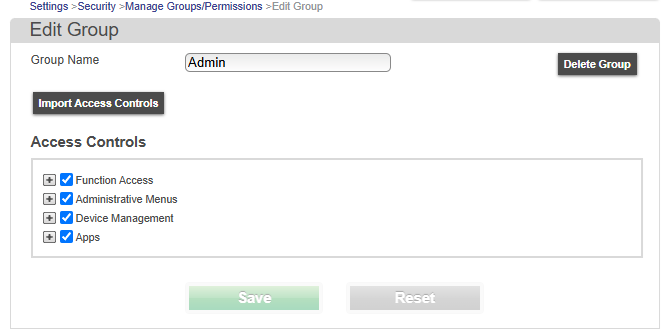
Check the Admin group’s rights: under Local Accounts > Manage Groups/Permissions, open Admin and make sure all four access-control nodes are ticked: Function Access, Administrative Menus, Device Management and Apps.
-
Test it now: open a private browser window, browse to the printer, and log in as the new account. Confirm you can open Settings > Security. Do not continue until this works.
1b: Remove administrative access from Public
Back under Login Methods, next to Public click Manage Permissions and untick Administrative Menus and Device Management, then save.
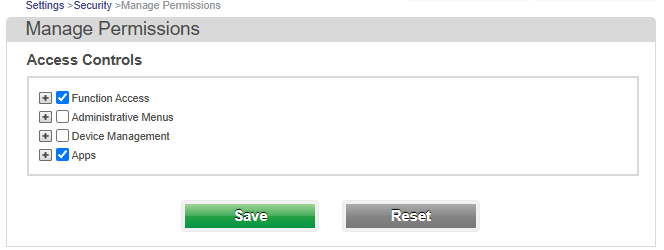
Browsing to the printer anonymously now shows only the status pages, and every settings menu demands the admin login. The panel’s device menus are protected the same way, since the panel evaluates the same permissions.
1c: Reduce Public to the minimum
Still in Public’s Manage Permissions, expand Function Access and untick everything except B/W Print and Color Print, and untick the Apps node. Save.
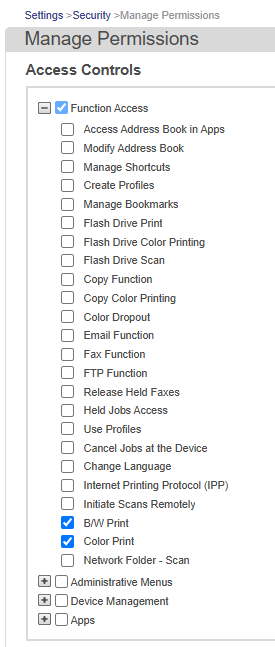
This is the end state for Public: no walk-up copy, scan, fax, email, USB or apps. Users get those back the moment they sign in to Print Director, which re-grants what each user is allowed, and the known third-party apps (Scan Center, Card Copy, Lexmark Cloud Connector) keep working for signed-in users. Two adjustments to know about:
- B/W Print and Color Print stay only while jobs are delivered over RAW or LPR. They let the device accept the anonymous job stream Print Director delivers; remove them and every released job is accepted and then cancelled. They are not needed, and should be unticked, once the device uses Download print (the device fetches the job in the signed-in user’s context) or authenticated IPPS delivery (Step 4). Leaving them on does not weaken per-user control: colour and quota policy are enforced per signed-in user.
- Apps Print Director re-grants on sign-in. A signed-in user gets back Card Copy, Scan Center (including the Scan Center Custom 1 to 10 slots), Cloud Connector, Change Wallpaper, Screen Saver, Slideshow and New Apps, as well as copy, email, fax, FTP, network-folder scan and flash-drive print and scan. You can see this list on the device under Login Methods > Print Director Auth > PD Base. Any other third-party app is not on that list, so once the Apps node is unticked it will not launch for anyone. For such an app, expand Apps under Public and tick just that app. Print Director’s per-page job check still applies to whatever it prints or scans.
Step 2: Configure SNMP v3 on the printer
Print Director reads page-count meters from the device over SNMP, exactly as described in the KM hardening guide’s How Print Director uses SNMP on the device section: the reading is taken by the PDServer or a PDAgent (per the device’s Request route setting), and that host must reach the printer on UDP port 161. Print Director supports SNMP v1, v2c and v3 per device, and only ever reads, so it is the device’s read-only v3 credentials it needs.
-
In the Embedded Web Server go to Settings > Network/Ports and expand SNMP.
-
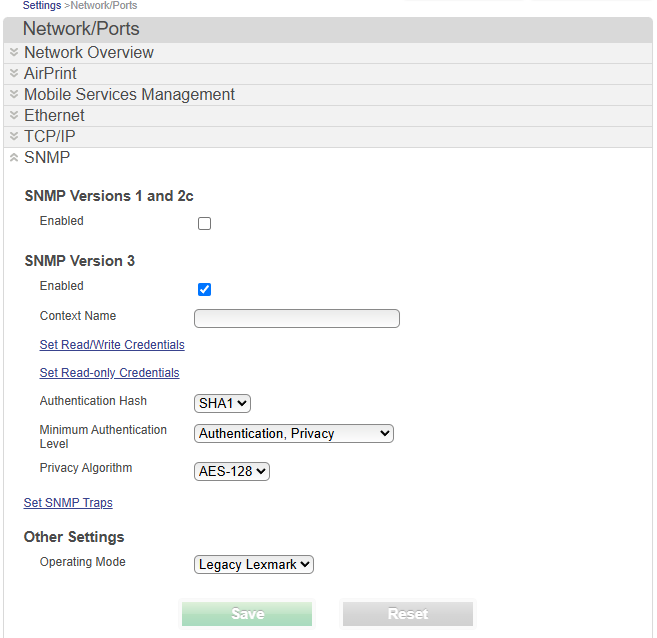
Under SNMP Versions 1 and 2c, untick Enabled. This is what clears the critical scanner findings. If something in the fleet still needs v1/v2c during a transition, keep it on for now but change the community name from
public, and plan to disable it: scanners flag v1/v2c as end-of-life regardless of the community name. -
Under SNMP Version 3, tick Enabled and set:
- Context Name: leave blank. Resource Manager’s Context name must match, so also blank.
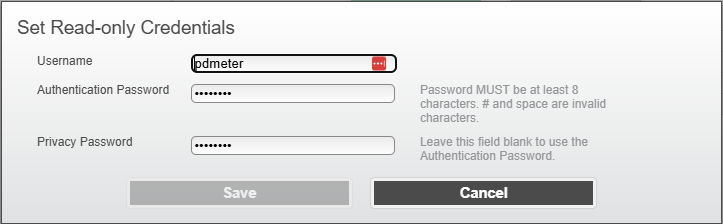
- Set Read-only Credentials: click the link and enter the read-only Username (for example
pdmeter), an Authentication Password and a Privacy Password, then click Save. These are the credentials Print Director uses. Both passwords must be at least 8 characters and may not contain#or a space. Fill in the Privacy Password explicitly: the dialog notes that leaving it blank makes the printer reuse the authentication password for encryption, which is easy to forget when you later enter the encryption key in Resource Manager. The Set Read/Write Credentials link is a separate user that Print Director does not need; if it is set, give it its own strong passwords.
- Authentication Hash and Privacy Algorithm: choose the strongest the firmware offers. On the device pictured that is SHA1 and AES-128; newer firmware may add SHA-2. Note what you chose, because Resource Manager must match exactly.
- Minimum Authentication Level: Authentication, Privacy, so unauthenticated or unencrypted v3 queries are refused.
-
Click Save.
Step 3: Update the device in Resource Manager and verify readings
This side is the same as in the KM guide, because it is Print Director configuration rather than printer configuration.
-
In Resource Manager go to Print Management > Shared Devices and open the device. To give several devices the same settings, select them together; in the SNMP connection settings window, tick the checkbox beside each setting you change, including the one beside the v3 fields.
-
Select SNMP in the category list on the left, make sure Enable SNMP readings is ticked, then click SNMP connection settings and set:
- Request route / Port / Read timeout / Retries: leave as they were.
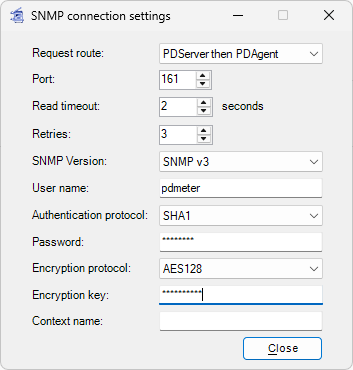
- SNMP Version: SNMP v3. The Read community field becomes User name; enter the read-only user from Step 2.
- Authentication protocol: match the printer’s Authentication Hash (
SHA1for the device pictured). Password: the Authentication Password you typed into the printer’s Set Read-only Credentials dialog. - Encryption protocol: match the printer’s Privacy Algorithm (
AES128). Encryption key: the Privacy Password from that same Set Read-only Credentials dialog. It is a second passphrase, not a key you generate: the printer and Print Director each derive the AES key from it. Do not leave it blank: with no key Print Director sends an authenticated but unencrypted request, which a printer set to Authentication, Privacy rejects. - Context name: blank, matching the printer.
-
Click Close, save the device, then click Request reading now in the SNMP category and refresh Last status. A success with a timestamp means the v3 settings match.
-
If the site auto-creates shared devices with an SNMP check required, update the Default shared device entry with the same v3 settings, as covered in the KM guide.
If the reading fails
The reason is written to the PDServer (or PDAgent) log as RunSnmpQueryForDevice:
authentication failure: the user name, authentication password or authentication protocol does not match the printer’s read-only credentials and Authentication Hash.error in response. AuthorizationError: the request arrived with a lower security level than the printer’s Minimum Authentication Level allows. Almost always the Encryption key in Resource Manager is blank, or the Encryption protocol does not match the printer’s Privacy Algorithm.Request timed out: either the host taking the reading cannot reach UDP 161 on the printer (or SNMP v3 is not enabled), or, if the same device answered a moment ago with one of the errors above, the Encryption key does not match the printer’s Privacy Password. A printer that cannot decrypt a request drops it without replying, so a wrong privacy password looks like a timeout rather than an error. The usual cause is a Privacy Password left blank on the printer: it then silently uses the authentication password for encryption, while Resource Manager was given something else. Open Set Read-only Credentials, set the privacy password explicitly, save, and enter exactly the same value as the Encryption key in Resource Manager.
Step 4: Deliver jobs over IPPS and close the plaintext print ports
By default Print Director delivers released jobs to the printer unencrypted over TCP 9100 or LPR 515, so those ports must stay open to the print servers (restrict them with network ACLs). From Print Director 2.5.14, delivery can instead go over IPPS: encrypted with TLS, optionally authenticated, after which 9100 and 515 can be closed on the device.
On Lexmark, authenticated IPPS also finishes the Public lockdown from Step 1: a job delivered with credentials runs as that account instead of Public, so B/W Print and Color Print can be removed from Public too.
The full setup is in two companion guides:
- How to set up IPPS on Lexmark printers: the device side. IPPS is served on TCP 443 at the path
ipp/print(not port 631), and the guide covers creating the printer account for authenticated delivery, including the Lexmark-specific Browser login method requirement, using the same Login Methods pages as Step 1. - How to deliver print jobs securely with IPPS: switch the device to IPPS delivery in Resource Manager, choose a certificate trust policy, enter the credentials, and verify before closing 9100/515.
Verify it worked
- Administration: browsing to the printer anonymously shows no settings menus; the admin account opens them all.
- Walk-up use: at the panel, dismiss the Print Director login and try Copy or Card Copy. It should be refused. Sign in to Print Director and repeat: it works, and third-party apps you rely on launch.
- Meter readings: Request reading now succeeds and new readings appear under Reports > Device meter readings.
- Printing and release: send a job, sign in at the panel and release it, and confirm it prints. If a released job is accepted and then cancelled at the device, the delivery is arriving as Public without print permission: restore the two Function Access permissions, or complete authenticated IPPS delivery (Step 4).
- Re-run the vulnerability scan against the device. The open-administration and SNMP findings should be gone; with IPPS delivery in place the open 9100/515 observations go too. Remaining web-interface certificate and TLS findings are addressed the same way as on KM devices: restrict TLS versions and install a CA-issued certificate where the firmware allows, and record the remainder as accepted risk with the compensating network controls (dedicated VLAN, ACLs) noted.
Related
- Lexmark print permissions for delivered jobs: the full explanation of why delivered jobs run under Public, and the two supported configurations.
- How to set up IPPS on Lexmark printers: the device-side IPPS endpoint and printer account.
- How to deliver print jobs securely with IPPS: IPPS delivery, trust policies and authentication in Resource Manager.
- How to harden the security of Konica Minolta printers: the KM counterpart of this guide, including the shared Print Director SNMP background and the scanner-finding table.
- How to open a device meter reading report: where the SNMP readings surface.
| Document revision date: 2026/10/23 Software version: 2.5.15.3 |